Showing posts with label holiday. Show all posts
Friday, December 17, 2010
DIY Christmas Crochet/Knitting Tote Bag
I loved making this tote bag for the crochet or knitting enthusiast. When I was sketching the design I wanted to make a spot to keep scissors handy and not so easy to lose in the bag with all your yarn and felt, and book and pattern.
The instructions and details are at iLoveToCreate.com and there are tons more DIY gift ideas that you can still make in time for Christmas!
Thursday, December 9, 2010
Felt Christmas Stocking
A Berry Merry Christmas
You’ll have yourself a very merry Christmas with this holly berry stocking hanging from the mantle! All you need is colorful felt and Aleene’s® Fabric Fusion™ … let Santa do the rest!
I loved making this stocking, because I love felt and how crisp and clean it looks. This one is super fast to whip up and it would be easy to personalize by embroidering a monogram on the cuff. I hope you like it....
Labels:
Aleene's,
Christmas,
crafts,
holiday,
Pattie Donham Wilkinson,
Pattie Wack,
PattieWack
Sunday, December 5, 2010
DIY Video - Decoupaged Christmas Gift Box
Just like I promised,
the Holiday How-To Videos are being posted at
and here's a great idea to turn a plain paper mache box into a
personalized gift for someone special!
Tuesday, November 16, 2010
High-Heeled Pilgrim Party Shoe Favors
High-heeled Shoes and Thanksgiving?
Of course!
Who wouldn't want a darling Pilgrim Shoe Favor sitting at their place setting at your Thanksgiving dinner?
I have this Pattiewack Pattern Pak that has a great pattern for a paper shoe that I have been dying to make into a Pilgrim Shoe for a long time, and finally got around to it this year.
I simply traced the pattern from the original and cut it out.
I found an black file folder that was white on the inside, and I thought it was perfect for this, so I traced around the pattern onto the paper, and cut it out.
The lines on the inside of the shoe are the fold lines, so I grabbed my scoring tool and scored all of the lines.
Next, I folded all of the score lines inward, and the shoe magically started taking shape.
My little Tacky Glue was perfect for adhering all of the tabs on my Pilgrim Shoe.
The pattern has a cute little flower on the toe, but I cut it into a square so I could make it into a buckle.
And it wouldn't be a Pilgrim Shoe without a big gold buckle!
I cut one out of gold paper and glued it on to finish it.
I love how it turned out.
For the pattern, go to PattieWack.com and make one for everyone!
Saturday, November 6, 2010
DIY Thanksgiving Decorations
Pilgrim Hat Centerpiece, Candles and Party Favors
If you can cut & glue, this is the perfect project for your Thanksgiving dinner decorations.
The base of each one of the pilgrim hats is a simple clay pot and the hat brims are circles of foam core boards that are cut to fit perfectly on the rim of the pots when glued on.
I popped a pot of white daisy mums in the big one for a centerpiece.
The candles are pushed into styrofoam and then tufts of tulle are poked around them.
The favors are circles of tulle filled with candy corn and tie up in a bow.
Super simple, and simple fun!
Here's what you'll need:
Clay Pots
Black Spray Paint
Black foam board
Pencil
Compass
Craft knife
Metallic Silver Scrapbook Paper
Grey Felt
Steps for the centerpiece:
- Spray paint the clay pot black, let dry completely.
- Turn the pot upside down on foam board. Trace around the rim, then set aside. Use a compass to draw a line 4 inches from the traced circle.
- Cut around the outside circle with a craft knife, being careful to cut a nice, smooth edge.
- Cut out the inside circle, 1/2-inch smaller than the traced line. If you plan to use the pot as a cupcake tray instead of a flowerpot, don’t cut out the center hole.
- Glue the brim to the top of the pot.
- Cut out a buckle from silver scrapbook paper.
- Cut grey felt and thread through the buckle and glue around the rim of the pot.
Make the other pots the same way, only smaller.
Have fun!
Sunday, October 31, 2010
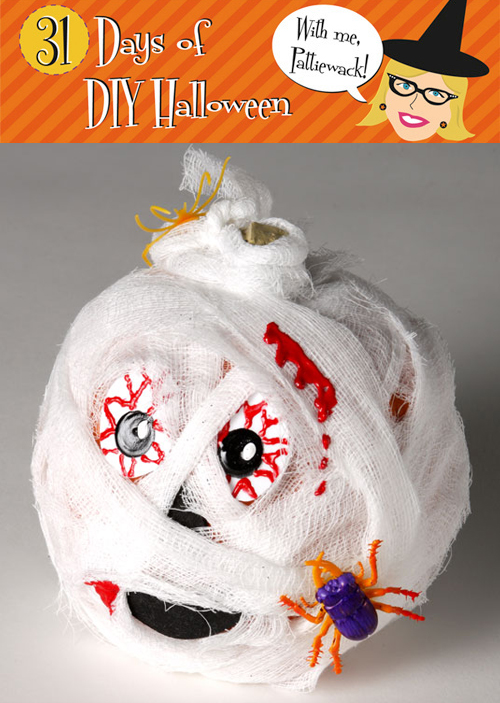
31 Days of DIY Halloween - Pumpkin Mummy

Isn't this cute Mummy pumpkin by my friend Cheryl Ball to die for (or should we say to DIY for)? Whahaha! If you are wanting to do a scary/spooky pumpkin that is still kid-friendly, then this one is for you! This pumpkin project will definitely be one that you'll get so wrapped up over making!
Materials:
– Tulip® 3D Fashion Paint™
65000 White
65038 Black
65130 True Red
– Aleene's® Fast Grab™ Tacky Glue
– Craft foam – white, black
– Pencil
– Low-tack masking tape
– Paper towels
– Gauze – 1 yard
– Pumpkin
– Plastic bugs
– Scissors
Instructions:
1. Use pencil to draw two oval eye shapes onto white craft foam then cut out.
2. Start 3D Fashion Paint on paper towel using an even pressure on bottle for a smooth line. Paint a black circle in centers of foam circles, True Red veins to edges then White highlights on black. Let dry.
3. Draw and cut a triangular nose and mouth shape from black craft foam.
4. Use Fast Grab to glue face pieces in place as shown, using small pieces of tape to hold in place until dry if needed.
5. Cut gauze into 2” wide strips by the length of gauze. Add a dot of glue to one end then press to back of pumpkin. Start wrapping strip around pumpkin, adjusting around facial features as shown. Glue on more strips as needed to cover pumpkin. Wrap stem then tie knot with ends.
6. Use True Red to create “cuts” and “drips” where desired. Let dry.
7. Glue bugs in place and let dry.
Craft on! Click here for today's daily giveaway!
Subscribe to:
Posts (Atom)