Saturday, October 9, 2010

Happy 3rd Anniversary to us!


I can't believe it's been 3 years since we tied the knot.  And I can't believe it took me so long to blog about it.  Our anniversary was September 28th, on a Wednesday in the middle of a work week.  We worked late that night, so we had dinner in town. 
It was fabulous.  We went to Campagnia and dined in the garden area with twinkle lights and the sound of a water fountain.  The goat cheese appetizer with sundried tomatoes was divine, and the rest of the meal was as delicious as my DATE!  (teehee)

The neatest thing was when we were seated, they knew our name because of the reservation, and the waiter came over quickly with two nice glasses of champagne... "compliments of Kristen Bibb!"  We had been working closely with her all week and she surprised us with a tasty toast.  Thanks so much Kristen... 

We are looking forward to many more years of wedded bliss.... yipppeee!

31 Days of DIY Halloween - Tie Dye Pumpkin Shirt


Don’t you love this Halloweenie pumpkin shirt? I do too! Believe me I could say otherwise because we made 135 of these fun shirts for a craft store chain to put in all their stores. Allee and I had buckets of dye, piles of shirts, and tables lined up with tie-dyed shirts ready for their faces. Cheryl Ball painted every single one with 3-D paint for their happy faces. The iLoveToCreate team really rocked it!

Materials:
– Tulip® One-Step Fashion Dye™ in Orange
– Tulip® Fashion Form™
– Tulip® 3D Fashion Paint™ in 65038 Black
– Tulip® Surface Cover™
– Plastic wrap
– Paper towels
– Scissors
– Chalk pencil or chalk sharpened to a point
– T-shirt – white – 100% cotton

Instructions:

1. Wash T-shirt to remove sizing; do not use fabric softener.

2. Cover work surface with Surface Cover and lay damp T-shirt flat on prepared surface. Starting just above center of shirt, pinch fabric and pull up into a tube shape. Tightly wrap a rubber band from dye box around fabric, about 4” below top point. Wrap another rubber band 2” below the first rubber band.

3. Wearing gloves from dye box, add water to Orange dye bottle to line indicated on bottle. Replace cap tightly and shake bottle until dye is completely mixed.

4. Squeeze Orange dye onto the first part of tube shape, completely covering with dye. Skip the 2” section between rubber bands then squeeze dye onto remainder of shirt. Cover shirt with plastic wrap and let set 6 to 8 hours or longer for most intense color.

5. Carefully cut rubber bands off of shirt and rinse shirt in warm water until excess dye is removed and water runs clear. Wash separately in a large load of water with hottest water suitable for fabric and a small amount of laundry soap. Dry separately.

6. Lay shirt on work surface and place Fashion Form between layers of shirt. Print out Jack-o-lantern face pattern and trace over pattern lines with chalk. Place pattern chalk side down on shirt and rub hand over the back of paper to transfer design in chalk onto shirt.

7. Start flow of Black Slick 3D Fashion Paint on paper towel to get a feel for bottle, using an even pressure on bottle for a smooth line. Outline then fill in each facial feature with Black Slick. Let dry flat.

Watch the video to see how we dyed over 100 tie dye pumpkin shirts at a time!

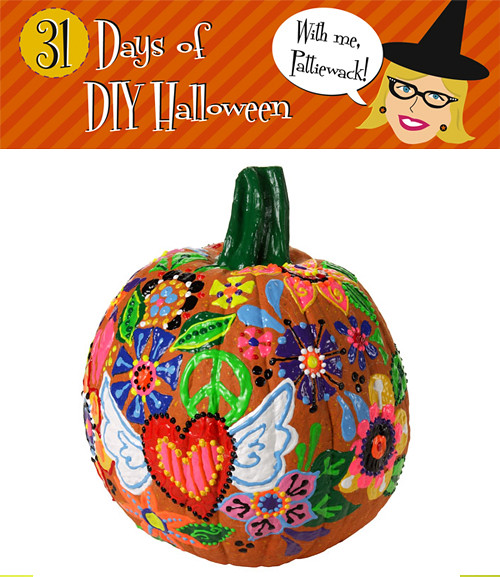
31 Days of DIY Halloween - Doodle Pumpkin

doodle pumpkin

I know! I forgot to post a project yesterday (Friday) for my 31 Days of DIY Halloween. It was a busy, busy day at the iLoveToCreate design studio and I completely lost track of time.

But I think this little pumpkin will make up for it!

Turn an ordinary decorative pumpkin into a Funkin with Scribbles® Dimensional Fabric Paint™! Doodle your favorite designs all over your pumpkin for fun effects. Get the kids involved and see how creative they get with their doodles!

Materials:
–Scribbles® Dimensional Fabric Paint Value 20 Pack
– Pumpkin
– Small paintbrush
– Foil
– Paper towels
– White chalk

Instructions:
1. Use white chalk to draw basic shapes onto pumpkin.
2. Start flow of Scribbles® paint on paper towel using an even pressure on bottle for smooth line. Keep tip of bottle clean by wiping with paper towels.
3. Fill in basic shapes with all colors of dimensional paint. Refer to photo. Let dry.
4. Add second layers of design and detail as shown then add dots and finer detail. Let dry.
5. Squeeze a puddle of Green paint on foil. Use a small brush to paint onto stem. Let dry then repeat step.

Thursday, October 7, 2010

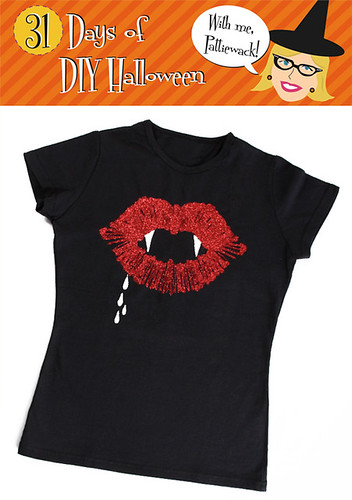
31 Days of DIY Halloween – Love Hurts Vampire T-shirt

halloween-vampire-shirt

This is my all-time favorite Halloween shirt! Cheryl Ball made it after we brainstormed how to use the technique where you paint one half of the design and then fold the shirt in half. When you unfold it you’ll see PERFECT LIPS! It really IS fabulous and fun to do, and you’ll make all the other girls jealous at the party when you show up in this glittery shirt. Love hurts.

Materials
– Tulip® 3D Fashion Paint™
Deep Red Slick
White Slick
– Tulip® Fashion Glitter™
Red Fine Jewel
Silver Fine Jewel
– Black t-shirt
– Pink chalk sharpened to point
– Scissors
– Iron
– Freezer paper
– Stiff brush
– Paper towels
– Scratch paper

Instructions:
For best results, please read all instructions before beginning project. Refer to photo for color and design placement.

1. Wash shirt without softener to remove sizing. Dry in dryer then iron smooth.
2. Cut a piece of freezer paper to fit inside shirt then insert to shirt. Fold shirt in half lengthwise pressing fingers along fold for stiff crease then open shirt.
3. Cut out lip design from pattern sheet. Line up edge along fold on shirt then use chalk to lightly trace around pattern. Remove pattern.
4. Start Flow of Deep Red 3D paint on paper towel using an even pressure on bottle for a smooth line. Starting at upper lip next to fold, squeeze a continuous line of paint within area in a back and forth motion squeezing up and down following the couture of lips. To create ink blot effect, immediately fold shirt over along fold line lining up sides of shirt. Use fingertips to press over paint making sure to work right up and over fold. Open shirt to reveal design.
5. Immediately sprinkle Red Glitter over wet paint. Wait a few minutes, and then carefully pounce off excess glitter onto scratch paper. This glitter can be put back in bottle and re-used.
6. Use chalk to lightly draw teeth where shown then fill in with White Slick.
7. Use White Slick to add drops from lips if desired then sprinkle with Silver Glitter. Let paint thoroughly dry – thicker paint may take a little longer.
8. Pounce excess glitter onto scratch paper then lightly brush with hand to remove excess.
9. Wait 72 hours to wash. Machine wash warm on gentle cycle. Do not use harsh detergents or bleach. Remove promptly and line dry. To iron, turn garment inside out, being careful not to touch design with iron. Do not dry-clean.

Craft on! Click here for today's daily giveaway!

Wednesday, October 6, 2010

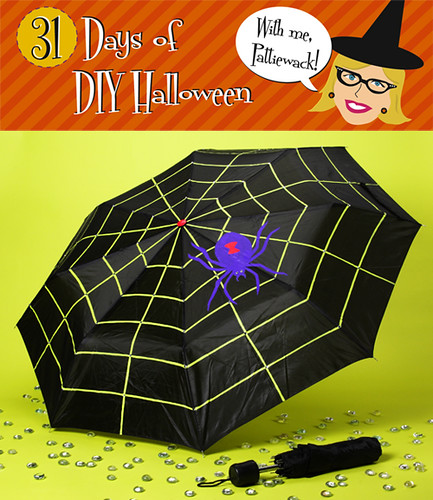
31 Days of DIY Halloween - Creepy Cobweb Umbrella

halloween umbrella

When I designed this spooky umbrella with Tulip® Soft Fabric Paint™, I thought it would be fun for mommy or daddy to hold when walking the kids around the block. The kids will know exactly where you are! Oh, and wouldn't it be fun to hang several from the ceiling to decorate your Halloween party?

Materials List:
– Tulip® Glam-It Up!™ PDA: Personal Dazzle Assistance™
26641 Clear

– Tulip® Soft Fabric Paint™
BI15790 Crimson Red
BI15793 Grape
BI15797 Lime

– Paintbrushes – Liner, Round
– Umbrella – black
– White chalk pencil
– Small round sponge
– Water dish
– Foil
–Pattern (click here for pattern)

Instructions:
1. Set umbrella in “open” position. Referring to photo as a guide, use chalk pencil to lightly sketch cobweb lines all around umbrella.

2. Print out spider pattern and flip over to backside. Trace design with chalk pencil then flip back over and place chalk side down onto umbrella. Run hands over paper to transfer spider design in chalk onto umbrella.

3. Squeeze puddles of each color of Soft Fabric Paint onto a piece of foil. Using Liner brush, paint Lime over cobweb design. Note: two coats may be needed for optimum brightness. Let dry between coats.

4. Using the Round brush, apply two coats of Grape to spider. Let dry between coats.

5. Sketch hourglass shape onto spider with chalk pencil, then apply two coats of Crimson Red to hourglass and “button” at top of umbrella, letting dry between coats.

6. Allow all paint to thoroughly dry, then wipe away any remaining chalk with damp sponge.

7. Peel crystals from backing and stick onto eyes of spider and all cross-sections of cobweb.

Tuesday, October 5, 2010

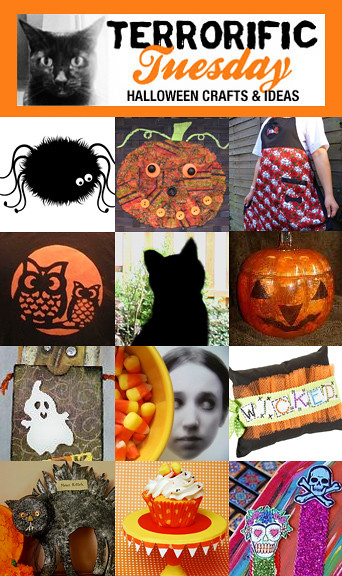
Terrorific Tuesday!

terrorific tuesday 2010 week 1

Kate Pullen shares 3 cute digital stamps Free cute spider digital stamps.

Phyllis Dobbs makes an easy Halloween Decopauge Pumpkin Treat Basket.

Jenna Excell shares her super cute and spooky Bones Halloween Apron.

Korinne Zimmerman a.k.a. Crafterella makes a wonderful spray bleach shirt using an adorable Moon Owl Stencil.

Glory's Mischief haunts her house with her Faux Cats in window.

Ann Butler makes this boo-tiful Reverse Collage Decopauge Jack-o-Lantern.

Eileen Hull tucks away Halloween cards in this fun Sizzix ScoreBoard notebook pocket.

Silvia Chenault and Patty Cappelluti share two super spooky projects on Silvia's blog: Vampire Art and Creepy Mirrors!

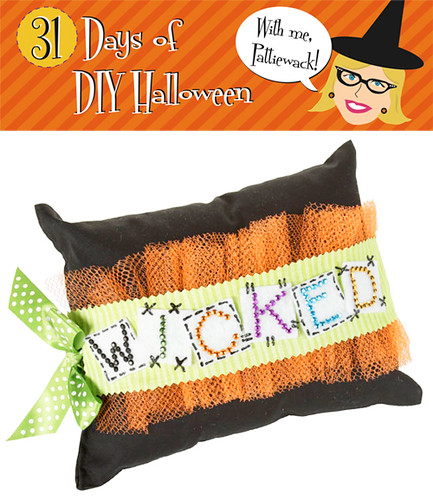
Pattiewack shows you how to make this cute and Wicked Pillow.

Messy Missy brings the LOLs with her Mean Kitteh.

Alexa Westerfield a.k.a. Swelldesigner whips up a Cute Candy Corn CD Cupcake Stand .

Kathy Murillo a.k.a. Crafty Chica delights us with glittery Skull Bookmarks.

That's it for this week! If you are interested in playing in Swelldesigner's Terrorific Tuesday roundup, e-mail her at swelldesigner (at) gmail (dot) com and she'll send you the details!

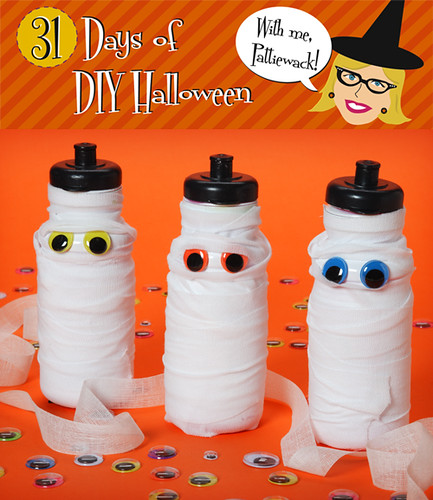
31 Days of DIY Halloween - Mummy Mania

halloween day 5

The kids will love these funny water bottles I created for Halloween. You can make these perfect Halloween party favors in no time at all with a little help from Aleene’s®.

Materials list:
– Aleene’s® Crystal Clear Tacky Spray™
– Aleene's® Original Tacky Glue®
– Gauze bandage
– Scissors
– Plastic “googly eye” appliqués
– White plastic water bottle

Instructions:1. Use Aleene’s® Original Tacky Glue® to adhere googly eyes to neck of bottle as shown in photo. Let dry.
2. Cut three strips of gauze that are approximately two feet in length.
3. Spray strips with Aleene’s® Crystal Clear Tacky Spray™, then wrap around entire bottle (sticky side down), making sure not to cover eyes. Refer to photo.

Monday, October 4, 2010

31 Days of DIY Halloween - Bony Grip Mug

halloween day 4

My morning coffee will taste great in this scary mug with a bony grip. If you want to make your own, look no further than this Duncan Oh Four™ Bisque Geometrix Mug Tri-Handle. Rely on the Concepts® Underglaze for Bisque and Majolica colors for a gripping good time anytime of the year.

– Duncan Concepts® Underglazes for Bisque and Majolica
CN 244 Really White
CN 253 Dark Black

– Dinnerware Bisque Designs
21786 Geometrix Mug Tri-Handle 5" x 5" x 3"

– Signature Brushes
SB 806 No. 6 Round, SB 807 No. 6 Fan Glaze, SB 808 No. 4 Round

– Pure Brilliance® Clear Glaze
– Sponge
– Pencil
– Graphite paper
– Foil
– Patterns (Click here for pattern)

Instructions:
1. Wipe ware with damp sponge to remove any dust.
2. Place graphite paper around mug with pattern over it. Trace over lines with pencil.
3. Pour puddle of Really White on foil. Using No. 6 Round brush, apply 3 coats of Really White on skeleton hand. Let dry after each coat.
4. Pour a good amount of Dark Black on foil. Using Fan Glaze brush, apply 3 coats of Dark Black inside cup. Let dry between coats.
5. Using No. 4 Liner brush, apply Dark Black between fingers and joints.
6. Using Fan Glaze brush, apply 3 coats of Dark Black to fill in remainder of mug. Let dry after each each.
7. Stilt and fire to cone 06.

Craft on! Click here for today's daily giveaway!

Sunday, October 3, 2010

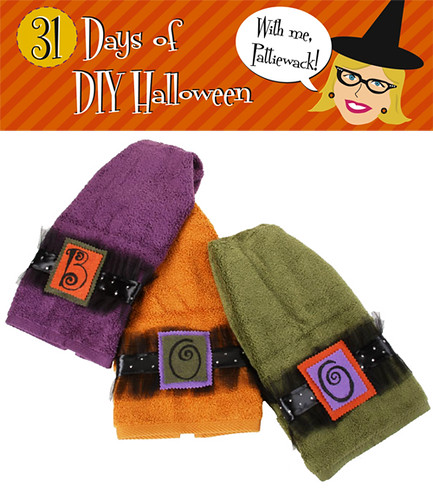
31 Days of DIY Halloween - Terrifyingly Terrific Towels

halloween day 3
I totally want these in my bathroom and I'm hoping my guests will scream with delight over these Halloween towels! Turn ordinary towels into freakishly fun room accents with ribbon, felt and a little pizzazz from Tulip® 3D Fashion Paint™ and Tulip® Glam-It-Up!™ Iron-On Crystals™.

Terrifyingly Terrific Towels

Materials List:

– Aleene's® Fabric Fusion® Permanent Dry Cleanable Fabric Adhesive
– Tulip® 3D Fashion Paint™ in 65038 Black
– Tulip® Glam-It-Up!™ Iron-On Crystals™ in 23123 300 Clear Pack
– Felt – colors to match towels
– Sewing machine with black thread
– Satin ribbon – black – 1½” wide – 1 yard per towel
– Pinking shears
– Paper towels
– Toothpicks
– Tulle – black – ½ yard
– Foil
– White chalk sharpened to a point
– Crayon
– Towels – desired Halloween colors
– Sewing pins
– Ruler
– Scissors

Instructions:
1. Cut a 6” wide length from tulle. Double over, creating several layers and holding with pins as needed. Use machine to sew two rows of gather stitches down center. Gather up fabric to fit across one end of towel then pin in place on towel to secure.

2. Center ribbon right side up over gather stitches on tulle then sew through all layers down both sides of ribbon.
Measure and cut a 2½” x 2¾” piece from each color of felt using pinking shears to cut out. Use chalk to draw desired letter in center of felt as shown. Start flow of Black Slick paint on paper towel using an even pressure on bottle for a smooth line. Fill in each letter with a thick, even line of paint. Let dry.

3. Squeeze a thin bead of Fabric Fusion onto back edge of felt piece, smooth with fingers then press into a different color of felt as shown. Let dry then use pinking shears to trim excess felt, leaving a ¼” or so border showing.

4. Apply glue to back of felt piece, center over ribbon and center of towel then press in place. Repeat step with remaining towels. Let dry.

5. Squeeze a small puddle of Fabric Fusion onto foil. Working in sections at a time, use toothpick to add a small dot of glue for each crystal. Touch top of crystal with tip of crayon and position into glue – it will hold it just long enough to transfer crystal in place on glue. Repeat along length of ribbon on each towel as shown. Let dry.

Saturday, October 2, 2010

31 Days of DIY Halloween - Wickedly Charming Pillow

halloween-day-2
I went absolutely mad for this wickedly charming pillow, perfect for spookifying your home this Halloween! Team up Aleene’s® Fabric Fusion™ and Tulip® Glam-It-Up!™ Iron-On Studs™ with ribbon, felt and tulle to make a pillow that’ll have your family screaming with delight!

Wickedly Charming Pillow

Materials List:
– Aleene's® Fabric Fusion® Permanent Dry Cleanable Fabric Adhesive
– Tulip® Glam-It-Up!™ Iron-On Studs™
– Tulip® 3D Fashion Paint™ in 65038 Black
– Tulip® Cordless Heat Setting Tool™
– Ribbon – 1½ yards (or enough to tie around pillow and tie bow) – 1” wide – lime
– Ruler
– Pinking shears
– Sewing pins
– White felt – 1 sheet
– Black pillow
– Fabric – 4” strip by circumference of pillow – lime
– Sewing machine with matching thread
– Paper towels
– Scissors
– Tulle – ¼ yard – orange
– Crayon
– Pencil

Materials List:

Instructions:
1. Find center of ribbon and place on right side of pillow then pull ends to other side and tie a bow. Place a pin just before bow on each side to mark for wording. Untie and remove ribbon, carefully keeping pins in place.

2.Fold tulle over lengthwise, creating several layers. Sew two lines of gather stitches down center through all layers. Gather tulle to fit ribbon between pins, pinning in place to secure. Sew down both sides of ribbon then remove gather stitches.

3. Use pinking shears to cut lime fabric into strip wide enough to show 1” of tulle extending from top and bottom edges and long enough to reach ends of gathered tulle and fit between pins on ribbon. Apply a thin bead of Fabric Fusion along both edges on backside of fabric piece and one down center. Press in place over tulle piece as shown. Let dry.

4. Trim tulle to desired width then tie ribbon piece around pillow.

5. Measure and cut six squares in desired size from white felt, using size of pillow to determine proportional size of squares.
Squares will need to fit on ribbon across front of pillow as shown.

6. Working on one square at a time, use crayon to position Iron-On Studs into a letter to spell out “WICKED”. The wax on the crayon will hold stud just long enough to transfer to felt square. Turn on Cordless Heat-Setting Tool following package instructions. Touch tip of hot tool to top of stud and hold for two seconds. Remove heat tool and let stud cool, then touch stud with fingernail making sure it has adhered, if not add one or two more seconds. Add one letter from one color to each square.

7. Apply a thin bead of Fabric Fusion around back edge of felt square, smooth with finger and then press in place. Start with “W” then equally space remainder of letters across ribbon as shown. Let dry.

8. Start flow of Black Slick paint on paper towel using even pressure on bottle for a smooth line. Add faux stitching lines as shown. Keep tip of bottle wiped often for clean lines. Add all stitching and let dry.

9. The ribbon can be removed after the holiday.

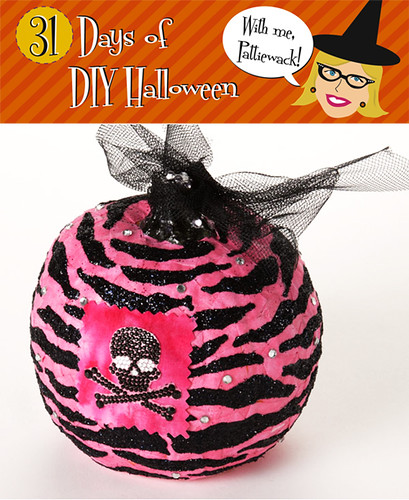
31 Days of DIY Halloween - Wild Child Pumpkin

halloween day 1

I love how Cheryl Ball turned a simple decorative pumpkin into wildly fun décor with vibrant fabric and Collage Pauge™ Instant Decoupage™! Add extra attitude with Tulip® 3D Fashion Paint™ and Tulip® Glam-It-Up!™ PDA: Personal Dazzle Assistance™.

Wild Child Pumpkin

Materials List:
– Tulip® Fashion Glitter™ in 23560 Black Fine Jewel
– Tulip® 3D Fashion Paint™ in 65038 Black
– Tulip® Glam-It Up!™ PDA: Personal Dazzle Assistance™ in 26637 Clear Red Black
– Collage Pauge® Instant Decoupage
– Aleene's® Fast Grab™ Tacky Glue
– Paper towels
– Pinking shears
– 1” foam brush
– Pumpkin
– Foil
– Scissors
– Tulle – 4” x 18” wide strip
– Scratch paper
– Small paintbrush
– Fabric – ¼ yard – bright pink – or desired color

Instructions:
1. Use scissors to cut fabric into about 1” squares.

2. Squeeze a puddle of Collage Pauge onto foil. Working in small sections at a time, use dry foam brush to apply an even coat to surface of pumpkin. Tap foam brush onto a piece of fabric then place into adhesive, then brush on another coat. Add another piece of fabric slightly overlapping the first then apply more over top. Repeat step until entire pumpkin is covered. Let dry.

3. Start flow of Black 3D Fashion Paint on paper towel using an even pressure on bottle for a smooth line. Place scratch paper on work surface. Working in sections at a time, paint on zebra stripes as shown. Immediately pour black glitter over wet paint then pour off excess onto scratch paper. Repeat step, letting paint dry if needed before moving to new section. When thoroughly dry, use small paintbrush to brush off excess glitter.

4. Squeeze a small puddle of Black 3D Fashion Paint onto foil then use small brush to paint stem of pumpkin. Let dry.

5. Peel skeleton design from plastic backing sheet then press onto a piece of pink fabric. Use pinking shears to trim into square as shown.

6. Peel off single clear crystal from backing sheet then press into place throughout design. Add black crystals to stem.

7. Use Fast Grab to glue fabric square to front of pumpkin as shown.

8. Tie a bow of tulle around stem.

Thursday, September 16, 2010

Aleene's Tacky Clear Gel on "Extreme Sweets" TV Special

https://blogger.googleusercontent.com/img/b/R29vZ2xl/AVvXsEgnJdzShDobVL8YfuVLyuLQRCaVL9tBykmL6BCDDhJ5kvDYieyhUmtZJBYIt2mD3HygOtT4Qy-OgeQoRTNpWNYd5M7sqddA7AhwtoW8ztQ8aAW2L94L-9Jy6cuZPoFOzUa0ifvs91HMA6Q/s1600/pattiewack-blogHeader.jpg


When Scott and I first saw this segment a few weeks ago we weren't fast enough to get our handy iPhones rockin' and capture the show. Being the video swami (his words) that he is, Scott found the segment on-line, captured it with some fancy software, did a little editing to shorten it up and BAMMM, here it is...one sweet product sighting for iLoveToCreate!

As you'll see, they were using Aleene's® Clear Gel Tacky Glue™ to put those amazing portraits together. I giggled when I saw that Scott put an arrow to a still pic of the glue at the end.

Watch as host Adam Guertler visits the Jelly Belly jelly bean plant in Fairfield, CA and is tasked with making his own Jelly Belly mosaic art piece using Aleene's Tacky Clear Gel. Great segment and great way to create a crazy craft!

Craft on! Click here for today's daily giveaway!

Monday, September 13, 2010

DIY Painted T-Shirts


I got so excited last night watching The Antonio Treatment, that I started yelling for Scott to come check it out. They were spraying t-shirts with our Tulip Fashion Spray for the kids to wear as smocks at the Hollywood Boys & Girls Club. They looked amazing as you can see here.


The renovation was unbelievable as the crew transformed the art room into a fabulously functional and fun place for kids to come to.

Awesome!

Oh, and I grabbed my iPhone and took lots of pictures so you can see how cool the room looked when they were finished.


Come see me at Pattiewack.com!

Friday, September 10, 2010

Crystal Studded Stilettos


Any day is a good day for jazzing up a pair of high heels shoes, right? These gorgeous stilettos caught my eye at the payless shoe store, and were perfect for a wedding project we are doing here in the iLoveToCreate Design Studio.
They are so pretty just the way they are, and perfect for the budget-minded bride. BUT, think of the options, girl! With crystals and glitter at my fingertips, I really got carried away.

The heels are not covered in fabric, but some kind of leatherette, so instead of heat-setting I decided to grab the Liquid Fusion and get busy. I started by doing a polka dot of glue all over the heels, and then grabbed my Tulip Fashion Art Tweezers to pick up the largest crystals out of the adorable Tulip 300-pack Crystal carousel.

After those dried, I filled in the gaps with smaller crystals.

Turns out, that the carousel had just enough crystals to cover the heels.

The trick is, having those large crystals on there and letting the glue dry about an hour before you add all the rest. That way they don't move around like a big mudslide!

Of course, I had to glitter them. The Tulip Fashion Glitter Bond went on very smoothly with the little applicator that comes in the kit. I pretty much covered one side at a time with glitter bond and then sprinkled them solidly with Multi Ultra Fine Glitter is absolutely amazing, and looks so glamorous!

Not only are the perfect for a glam bride, but they are faulously fun for dancing at the reception!

Tuesday, August 3, 2010

CHA Summer Highlights


It's great to be back home after a long week in Chicago for the CHA Summer 2010 trade show, and the Craft Super Show. I am pooped, but happy with the success of the designs my team created for the iLoveToCreate booth.


All of the mannequins made it through shipping. I was so worried about the jewelry stand that I made, but it was still intact. (More about that later...)

Dr. McTacky made it too! He was there to take care of any glue emergencies.

The Chicago pizza was absolutely incredible. Scott and I were a little delirious after working our tushies off to assemble the booth with the iLoveToCreate team.


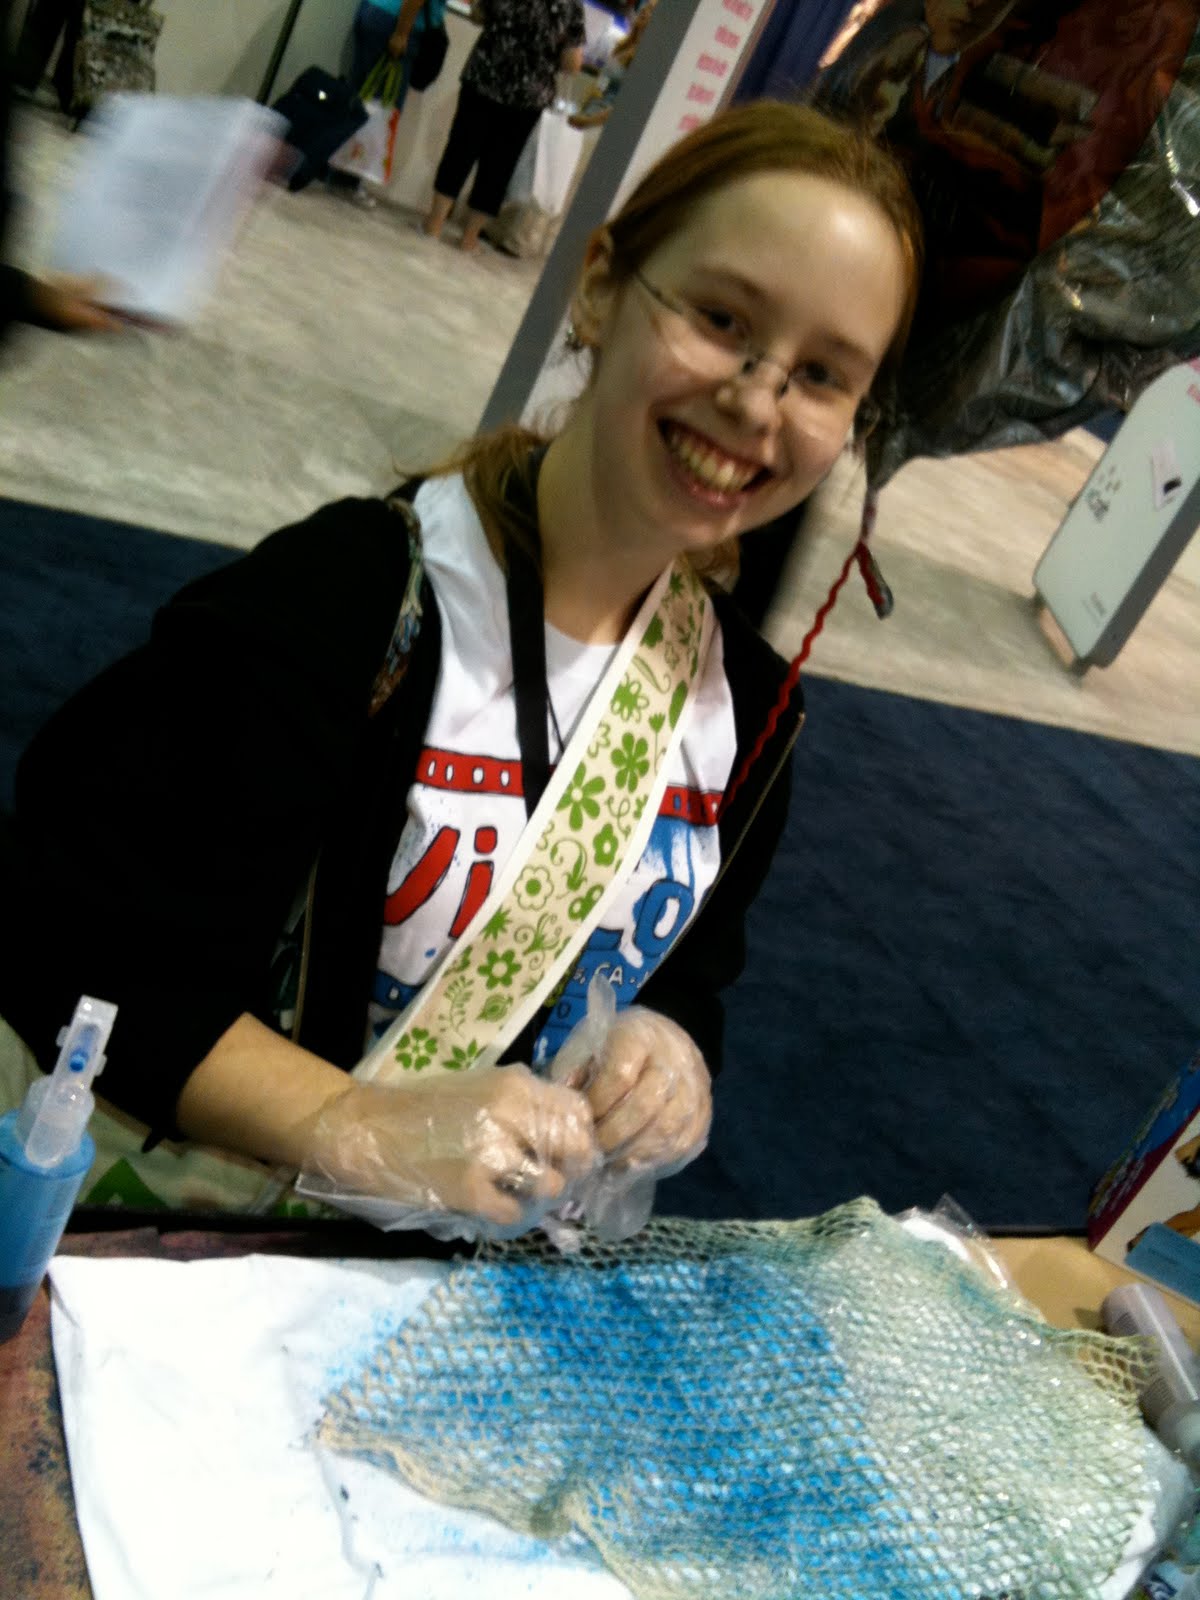
We had some crazy fun crafters come by to do make-it-take-its with the new Tulip Fashion Dye Kits.

We even had some male crafters, including this dude that made a bag for his mom. Sweet!

The Creative Juice hosts Cathie & Steve dropped by for a happy hug.

Margot Potter was stunning and chic in her incredible jewelry and gave me an autographed copy of her new book, "Bead Chic" !! I love it! I love the extreme jewelry, so head to the book store and check it out!

My Statement Necklace Workshops were filled with amazing people at the Super Show. They were a big hit! The Rorshach design was a huge aha moment and they loved all the bling you could get out of recycled pair of jeans, turned into a bib necklace.

Tiffany Windsor was a terrific host for her live web cam at the super show on COOL2CRAFT. We had a blast with everyone being on camera and covering the great crafts being made by the consumers in our booth.

The super show was wild with crafty frenzy. But we had fun!

Ahhh.... it was a good show, and my bathtub was my best friend.
I'll be posting about more of the projects to show how to use fashion embellishing products to their fullest!