Showing posts with label Halloween. Show all posts

Friday, October 22, 2010

DIY Spider Web Necklace


I love Halloween! And the peeps at iLoveToCreate love it toooo.


Our copy writer Chloe Tatro, is modeling the Black Widow Necklace that took about 5 minutes to make. And if you're like us, you're looking for a fast and easy "costume" for Halloween. So, I came up with this crazy idea to create costume necklaces.


You'll never believe that this is only Tulip 3-Dimensional Slick Paint.
That's ALL!

EeeeeeEeeEeeeK! Chloe's neck has been slashed!

Look closer and you'll see that it's another one of my Tulip 3-D Paint necklaces made to look like bloooood. Eeeeyoooo.

The guys in the marketing department got into it, too. Nate Hough's neck was just the right size for a bigger squeeze of Tulip 3-D Paint to come oozing out in a bloody disguise.

Here's what you need:

Tulip 3-D Red Slick Paint
Teflon Sheet

Here's what you do:
Draw a circle of paint the same size as your neck, and then draw the paint into bloody drips on the sheet. I let it dry overnight to be sure that it's good and dry. Then put it around your neck and connect the ends together. They will stick together, but if you are very active, you may want to hold it together with a safety pin.

The spider web is done the same way with Tulip 3-D Black Slick Paint. Be sure that you connect it completely together so that none of the web falls down. You know, you could also paint a web on a shirt using this idea and have a permanent spider web to wear year after year.

Hey, thanks to Chloe and Nate for your necks….
Happy Halloween!
Pattiewack

Wednesday, October 20, 2010

31 Days of DIY Halloween - Spooky Ghost Vases

ceramic-ghosts

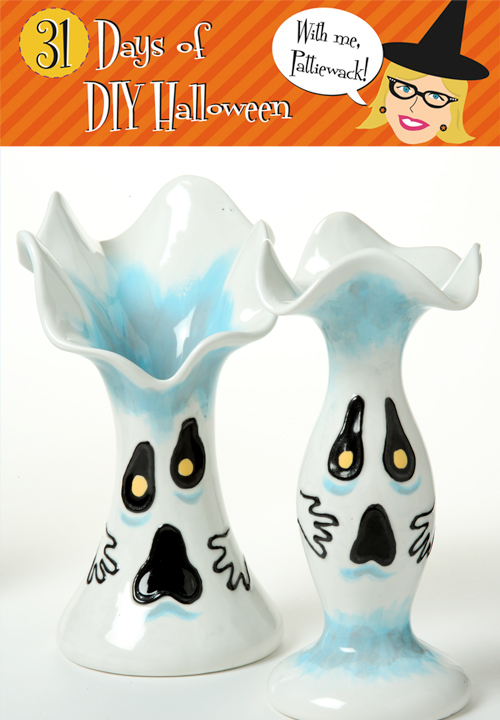
Scary-cute! That’s was I said when I saw these ghost vases. And they can be as scary or as fun as you want them to be, because YOU get to paint their faces. With a flick of the paint-brush, you could turn their scary faces into funny faces. I’m seeing sticks of cotton candy sticking poked into these vases, or maybe black licorice sticks. Yummmmmm……

Materials:
Home Decor Bisque Designs
21779 Slender Free Form Vase 4.5" x 4.75" x 4.5"
21780 Medium Free Form Vase 3.25" x 4" x 8"
Duncan Concepts® Underglazes for Bisque and Majolica
CN 021 Light Saffron
CN 141 Light Aqua
CN 201 Light Grey
CN 244 Really White
CN 253 Dark Black
Signature Brushes
SB 802 No. 1 Liner
SB 807 No. 6 Fan Glaze
SB 808 No. 4 Round
SB 812 No. 10 Round
French Dimensions™
FD 254 Black Licorice
pure•brilliance® Clear Glaze
– Graphite paper
– Pencil
– Water container
– Foil
– Replacement sponge
– Clean, plastic margarine-sized container
– Patterns (click here for patterns)

Instructions: 1. Wipe vase with damp sponge to remove any dust and/or particles.
2. Place graphite paper over the pattern on regular paper, then place graphite side down and onto vase. Trace over the eyes and mouth pattern using a pencil. The graphite should transfer onto bowl in the shape of the ghost face pattern.
3. Using the No. 10 Round Brush, brush three coats of Really White glaze over entire vase, excluding eyes and mouth. Allow time to dry between each application.
4. Using the No. 10 Round Brush, brush two light coats of the Light Aqua glaze onto the inside part of the vase stem, feathering upward toward the top. Allow time to dry between each application.
5, Using the No. 10 Round Brush, brush two light coats of the Light Aqua glaze at the very top of the outside portion of the vase stem, feathering upward onto the “folds” (top portion of the vase). On slender vase, brush Light Aqua glaze onto lower portion of vase where stem and base meet. Allow time to dry between each application.
6. Use the Liner Brush to apply Light Aqua glaze accents under eyes and mouth.
7. Brush one coat of Light Grey glaze over all Light Aqua areas on vase, blending outward.
8. Using the No. 4 Round Brush, brush three coats of Light Saffron glaze to pupil portion of eye area. Allow time for drying between each application.
9. Using the No. 4 Round Brush, brush three coats of Black glaze to remaining eye area, allowing time to dry between each application.
10. Using the same process described in Step 2, transfer hand pattern to vase.
11. Use French Dimension Black Licorice to outline eyes, mouth and hands.
12. Pour necessary amount of Pure Brilliance Clear Glaze inside of vase and rotate to cover entire inside. Pour excess glaze into empty container.
13. Sponge a thin coating of Pure Brilliance Clear Glaze onto entire outside of vase, including face portion, and let dry. Using Fan Glaze Brush, apply a second coating of Pure Brilliance Clear Glaze over entire vase and let dry.
14. Stilt and fire to shelf cone 06.

Craft on! Click here for today's daily giveaway!

Tuesday, October 5, 2010

31 Days of DIY Halloween - Mummy Mania

halloween day 5

The kids will love these funny water bottles I created for Halloween. You can make these perfect Halloween party favors in no time at all with a little help from Aleene’s®.

Materials list:
Aleene’s® Crystal Clear Tacky Spray™
Aleene's® Original Tacky Glue®
– Gauze bandage
– Scissors
– Plastic “googly eye” appliqués
– White plastic water bottle

Instructions:1. Use Aleene’s® Original Tacky Glue® to adhere googly eyes to neck of bottle as shown in photo. Let dry.
2. Cut three strips of gauze that are approximately two feet in length.
3. Spray strips with Aleene’s® Crystal Clear Tacky Spray™, then wrap around entire bottle (sticky side down), making sure not to cover eyes. Refer to photo.

Sunday, October 3, 2010

31 Days of DIY Halloween - Terrifyingly Terrific Towels

halloween day 3
I totally want these in my bathroom and I'm hoping my guests will scream with delight over these Halloween towels! Turn ordinary towels into freakishly fun room accents with ribbon, felt and a little pizzazz from Tulip® 3D Fashion Paint™ and Tulip® Glam-It-Up!™ Iron-On Crystals™.

Terrifyingly Terrific Towels

Materials List:

Aleene's® Fabric Fusion® Permanent Dry Cleanable Fabric Adhesive
Tulip® 3D Fashion Paint™ in 65038 Black
Tulip® Glam-It-Up!™ Iron-On Crystals™ in 23123 300 Clear Pack
– Felt – colors to match towels
– Sewing machine with black thread
– Satin ribbon – black – 1½” wide – 1 yard per towel
– Pinking shears
– Paper towels
– Toothpicks
– Tulle – black – ½ yard
– Foil
– White chalk sharpened to a point
– Crayon
– Towels – desired Halloween colors
– Sewing pins
– Ruler
– Scissors

Instructions:
1. Cut a 6” wide length from tulle. Double over, creating several layers and holding with pins as needed. Use machine to sew two rows of gather stitches down center. Gather up fabric to fit across one end of towel then pin in place on towel to secure.

2. Center ribbon right side up over gather stitches on tulle then sew through all layers down both sides of ribbon.
Measure and cut a 2½” x 2¾” piece from each color of felt using pinking shears to cut out. Use chalk to draw desired letter in center of felt as shown. Start flow of Black Slick paint on paper towel using an even pressure on bottle for a smooth line. Fill in each letter with a thick, even line of paint. Let dry.

3. Squeeze a thin bead of Fabric Fusion onto back edge of felt piece, smooth with fingers then press into a different color of felt as shown. Let dry then use pinking shears to trim excess felt, leaving a ¼” or so border showing.

4. Apply glue to back of felt piece, center over ribbon and center of towel then press in place. Repeat step with remaining towels. Let dry.

5. Squeeze a small puddle of Fabric Fusion onto foil. Working in sections at a time, use toothpick to add a small dot of glue for each crystal. Touch top of crystal with tip of crayon and position into glue – it will hold it just long enough to transfer crystal in place on glue. Repeat along length of ribbon on each towel as shown. Let dry.

Thursday, October 29, 2009

Halloween Girlie Costumes


Steampunk is soo fun for Halloween, and I LoVE this girlie girl costume I found while window shopping in the Tower District of Fresno. I WANT the mini top hat.

And this cute little Poker Face Girl is terribly cute. I'm sure there is an Ace in her pocket.

A little bit country corset with ruffles makes this outfit simply darling. The double ruffle at the bottom is over the top. Love it...

Rock Steady is the place to go for a last minute costume!

Tuesday, October 27, 2009

TWILIGHT JEWELRY BOX


It's TERRORIFIC TUESDAY, and I have the perfect project for you.
It's a:

TWILIGHT JEWELRY BOX!

I had so much fun designing this with a Twilight theme. At the iLoveToCreate studios, we have tons of old mannequins. These hands were laying on a shelf, just asking to be used in an unbelievably unique way.

So.... I grabbed an unfinished wooden box and painted it black. Then I found 4 huge beads to glue onto the bottom of the box with Aleene's Liquid Fusion. I rubbed the edges with silver rub-n-buff to give it an antiqued look.

I crystalized the glass apple (from the Dollar $tore) with an unbelievable amount of Tulip Crystals. I used the Aleene's Liquid Fusion again. I laid the apple in a martini glass to be able to turn it for different angles, and glued crystals in small areas at a time and let it set before moving on to another area, until the entire glass apple was covered with crystals. It looks delicious, but don't BITE it! teehee....

The last step was to assemble the mannequin hands on top with the crystalized apple and glue them into place the the Aleene's Liquid Fusion. I used a couple of bottles to lean the hands on, until the glue was totally set. I added a black satin bow where the wrists connect. That's it!

There you go.... a great Halloween project. Or, if you are a Twilight fan, or a Snow White fan, or you just love apples.... this is a great project for YOU....

Have a TERRORific TUESday!
Pattiewack

Sunday, October 25, 2009

Pet Costumes at the Pooch Parade


The Tower District in Fresno was alive today with the excitement of kids, people, and pets dressed up for Halloween. The costumes were amazing! I was lucky enough to have my camera phone and snapped a couple dozen pics. These are the best. Sorry they aren't better, but it's a bit tricky to get great pics of a pet parade. What fun!


My personal fave. The little chihuahua was dressed as a lobster.


Check out the tie dye....


Who's the pet here????

Monday, October 19, 2009

Halloween Punkin People


Check out my Punkin’ People Halloween Video for MyLifetime.com!

Friday, October 26, 2007

Peek-a-Boo Ghost


What a great idea for the kids! This is so easy, but fun. A perfect Sunday afternoon project or classroom craft, since it takes so few supplies. I found it at the Parenting.com site, where there are tons of parenting tips and ideas. Here's how to make your own Peekaboo Ghost.

• Poke a hole in bottom of black paper cup with chopstick. Slide stick up into cup. Plant a small Styrofoam ball on chopstick.
• Glue two 6-inch squares of cheesecloth (or tissue paper) and black-paper eyes onto ball.
• Slide stick up and down to play peekaboo.

Peek-a-Boo Ghost


What a great idea for the kids! This is so easy, but fun. A perfect Sunday afternoon project or classroom craft, since it takes so few supplies. I found it at the Parenting.com site, where there are tons of parenting tips and ideas. Here's how to make your own Peekaboo Ghost.

  1. • Poke a hole in bottom of black paper cup with chopstick. Slide stick up into cup. Plant a small Styrofoam ball on chopstick.
  2. • Glue two 6-inch squares of cheesecloth (or tissue paper) and black-paper eyes onto ball.
  3. • Slide stick up and down to play peekaboo.

Monday, October 22, 2007

Glitter Glow


Make all different sizes of jazzy jack-o-lanterns to fill the center of your table for a beautiful centerpiece. Sit the lanterns on a bed of luscious fall leaves, light the candles, and enjoy the shimmer and warmth of the colors and glitz. I made several of these in no time at all.

Steps:
1. Mask off a jack-o-lantern face, or stripes on each of your glass pieces.
2. Cover the entire glass piece with glue, using a disposable brush.
3. Pull off the masking tape.
4. Hold the glass over a sheet of paper and pour glitter over the glue, covering the entire piece. Use gold on the jack-o-lantern faces, and black glitter on the striped pieces. Sit aside to dry.
5. Fold the sheet of paper in half and pour the unused glitter back into the jar of glitter.
6. Place a tea light inside the jack-o-lantern to complete.

You can find lots more Halloween Crafts at my website!

Monday, October 15, 2007

Scary Stuffies


When I made these scary monsters for my glue book, I never realized just how popular these guys were going to be. I had seen them at craftster.org in every shape and size. Some were made from felted wool, cotton prints, and of course some were made by knit and crochet lovers. Mine are cut from felt yardage from the fabric store. You can sew these up, or you can glue them like I did in my new book, The Crafter's Guide to Glue. The big momma is about 18 inches tall and the baby is only 6 inches tall in his mommy's pouch. The pattern is in the book, and I used the same pattern for the baby stuffy as I did for the applique on the scarf. My daughter went nuts over this, so it just might end up in the grandson's Christmas stash. But, it would make a fun Halloween project too, if you used orange and brown and black felt. If you make this for a child, please be sure that all the pieces are sewn so that they won't come off. Now, all these little monsters need are their own names!

Thursday, October 4, 2007

Rustic Fall Wreath


Even if you don’t dress your trees with goblins and hang skeletons on your porch, you will love to welcome your guests with a fall wreath on the front door. I made this wreath with loops of dried vines. You can buy one wreath and toss it in the bath tub with warm water, take it apart and loop it into 2 or 3 loose wreaths like this. Grab a spool of floral wire and your glue gun to make a cluster at the top with about a dozen sprays of fall goodies. I picked gourds, leaves, acorns and pumpkins and added some purple accents. To top it off, I added the burlap bow in the center. Add a loop of wire on the back so that you can hang it on the door. You know I heard someone say that you only get one chance to make a first impression, and this would make a nice one!

If you've never made a bow, I did a little illustration for you, so you have no excuse. Now go for it!