Showing posts with label DIY Fashion. Show all posts

Tuesday, November 30, 2010

DIY Glitter Shoes, Crystal Heels, Party Shoes....Slide Show!

Break out the glitter and glue and give your 
humdrum heels a star-studded makeover! 
Here are some ideas whipped up with products from iLoveToCreate!

Saturday, November 20, 2010

Belle Armoire Magazine

I am so excited to say I was published twice in the November/December issue of Belle Armoire!

 This design was inspired by the late Alexander McQueen's amazing use of mirror image prints.  I developed a technique where you paint one-half of the garment and then fold the unpainted side over to the painted side, unfold it and voila!  This is so much fun, it's easy, and has a huge wow factor.

This couture ensemble was designed by me for a CHA trade show, using glue, and limited sewing.  All the beads and ruffles and sequins and feathers a glued to the lace blouse and skirt.  I actually too 2 skirts and altered them to form one tulip skirt.  You have to pick it up on the newstand and check it out!

From Belle Armoire's website today:

"Be delighted by the November/December 2010 issue of Belle Armoire. Heidi Selig’s genius works of clothing for kids is featured in the Designer Collection profile. Megan Morris saved up scraps from making purses to create the stunning scrap dress featured on this issue’s cover. Learn about fusing metals with Ruth Rae’s tutorial, which showcases beautiful pieces using the technique. See the results of the Little Black Dress challenge, where we challenged artists to make a little black dress that fit their personalities. See the beautiful embroidery work of Debbie Bone-Harris, in a jacket and ensemble that’s sure to inspire. Regardless of the type of art to wear you love, you’re bound to find it within the pages of the November/December 2010 issue of Belle Armoire."
What an honor to be included in the fascinating line-up of designer's in this incredible magazine!

Haute Handbags Magazine

I'm published in the latest Haute Handbags Magazine!

 I got a fabulous surprise last night when we went to Barnes & Noble 
after dinner to peruse the latest magazines.  
There I was in HAUTE HANDBAGS, baybeeeee!

The purse I designed was with a painted clutch with 4 rings glued to the closure for 
the snazziest evening bag ever, if I do say so.
woot woot!

Of course, this one of my fave magazines on the newstand, and it's 
published by Stampington & Company, 
which is responsible for several amazing magazines.
Fun, fun, fun!

Thursday, November 4, 2010

Altered Crochet Scarf

Not Quite Your Grandma's Doily

Please don't hate me because I can't crochet or knit.  And Puhlease don't hate me because I cut up a bunch of doilies and a knitted scarf to make this new Altered Scarf.

I promise they were discarded and then found at the thrift store by me.  They were certainly a treasure to me when I found them, as I had this design in mind which worked out beautifully with the loose scarf you see in the back, and then layered with the pineapple design doily and then the floral doily on top.  I dyed the pieces individually and then sewed them all together.

I was thrilled to see it featured in Altered Couture along with the Steampunk Hat as seen in the previous post.  It's one of my fave magazines!

Tuesday, November 2, 2010

Steampunk Altered Couture

Steampunk is always one of my favorite things to do as far as DIY fashion, jewelry, or collage.  I made this steampunk hat to coordinate with a paper dress for a tradeshow last year.   The Editor from the magazine, Altered Couture picked it up for this issue.
 
I was shocked recently when I was browsing the magazines at Barnes & Noble and saw my hat.  It realllly takes a long time for things to finally get published, but it's so cool when you open up a magazine, and there you are.
I'm crazy for Altered Couture, and I'm tickled to death to be featured in it!  
Of course, my crazy dude had to monkey around with it before it shipped out to the editor.  I can't have anything lying around without him grabbing it and putting on a show for me.
The aftermath of creativity.....


Saturday, October 30, 2010

31 Days of DIY Halloween - Kids Halloween T-shirt

boo tee
Here's a super fun way for kids or kids at heart to get their creativity on this Halloween! You even get to have ooey gooey fun when you dip your hands in the paint to turn your handprints into spooky ghosts! This is a great project for those kids who think they might be a little too old to dress up, but still want to wear a cool Halloween shirt!

Materials:
Tulip® Fashion Form™
Tulip® Sponge Brushes™
Tulip® 3D Fashion Paint™
65131 Orange
65177 Green Glow
Tulip® Soft Fabric Paint™
BI15784 Glacier White
– Baby wipes
– Paper towels
– White chalk
– T-shirt – black – 100% cotton
– Foil

Instructions:
1. Insert Fashion Form into T-shirt to prevent paint seepage.
2. Squeeze a generous puddle of Glacier White Soft Fabric Paint onto a piece of foil. Use dry 1” foam brush to apply a thin even coat to palm and fingers on right hand, avoiding thumb. Position right hand so fingers point toward hem, and place in center about 2” below neckline. Having fingers slightly closed, press hand onto fabric firmly, making sure all paint has adhered. Carefully lift hand then repeat step with same hand to create next ghost, leaving about 1” space between handprints. Clean hands with a damp paper towel or baby wipe.
3. Use white chalk to lightly draw a “B” the same size as ghosts. Refer to photo.
4. Test flow of Orange Slick 3D Fashion Paint on paper towel. Squeezing with even pressure on bottle for a smooth line, follow chalk line of “B” letter.
5. Use Orange Slick to add oval shaped dots for eyes and mouth on each ghost.
6. Use Green Glow 3D Fashion Paint to outline letter and ghosts. Refer to photo. Add random dots around shirt where desired.
7. Let dry. Follow label instructions for care of garment.

Craft on! Click here for today's daily giveaway!

Tuesday, October 26, 2010

31 Days of DIY Halloween - Twilight T-shirts

twilight romance tshirts

Allee created these insanely cool t-shirts for Twilight lovers everywhere. She used 3-D and soft paints for a romantic and soft yet edgy look. You could wear them on a date, or dress them up for a party with a little flirty red skirt and pumps.

Tulip® Fashion Form™
Tulip® 3D Fashion Paint™
65000 White
65038 Black
65130 True Red
Tulip® Soft Fabric Paint™
BI15790 Crimson Red
– Paper plate
– Computer
– Contact paper
– Gray chalk pencil
– Paper towels
– Men’s T-shirt – black
– Felt pen
– Makeup sponge
– Printer
– Women’s T-shirt – white
– Craft knife

“Love Bites” Women’s Tee1. Prewash and dry T-shirt. Insert Fashion Form between layers of tee.
2. Type out the words “Love Bites” on computer in desired font and size then print. Flip wording over and trace over letters with chalk pencil. Flip back over and place chalk side down onto top of tee. Refer to photo for placement. Rub hands over paper, transferring lettering onto tee.
3. Start flow of Black Slick 3D Fashion Paint on a paper towel, applying an even pressure on bottle for a smooth line. Trace and color in “Love Bites” with Black Slick. Refer to photo. Let dry.
4. Use felt pen to draw (or trace) a large heart onto contact paper. Use craft knife to cut out heart, leaving outside edges intact. 5. Peel backing from heart stencil and place onto tee where shown. Run a finger around edges to prevent paint seepage.
6. Squeeze a puddle of Crimson Red Matte Soft Fabric Paint onto a paper plate. Dab flat end of makeup sponge into paint then dab onto fabric within stencil. Let dry then repeat until desired opacity is reached. Let dry.
7. Squeeze two dots of White Slick onto upper portion of heart. Let dry, then use True Red Slick to create “blood” dripping out from white dots. Refer to photo.
8.Use Black Slick to outline heart and blood drips. Let dry.

“Killer Love” Men’s Tee1. Prewash and dry T-shirt. Insert Fashion Form between layers of tee.
2. Type out the words “Killer Love” on computer in desired font and size then print. Flip wording over and trace over letters with chalk pencil. Flip back over and place chalk side down onto top of tee. Refer to photo for placement. Rub hands over paper, transferring lettering onto tee.
3. Start flow of White Slick 3D Fashion Paint on a paper towel, applying an even pressure on bottle for a smooth line. Trace and color in “Killer Love” with White Slick. Refer to photo. Let dry.
4. Use felt pen to draw “slash” marks onto contact paper. Refer to photo. Use craft knife to cut out marks, then peel backing from stencil and place onto tee where shown. Run a finger around edges to prevent paint seepage.
5. Squeeze a puddle of Crimson Red Matte Soft Fabric Paint onto a paper plate. Dab flat end of makeup sponge into paint then dab onto fabric within stencil. Let dry then repeat until desired opacity is reached. Remove stencil and let dry.

Craft on! Click here for today's daily giveaway!

Saturday, October 23, 2010

31 Days of DIY Halloween - Little Ladybug Costume

ladybug costume
This is absolutely darling, and believe it or not, it’s just t-shirts!! A couple snips, a few quick stitches and you can make your little lady the cutest little bug on Halloween night!

Little Ladybug Costume

Materials:

Tulip® Glam-It-Up!™ Fashion Art Tweezers™
Tulip® Cordless Heat Setting Tool™
– Tulip® Glam-It-Up!™ Iron-On Crystals™
23123 300 Clear Pack
25621 Red
– 1 T-shirt, black
– 2 Pom Poms, 2” black
– 2 sheets Felt, stiff black
– Scissors
– 1 Headband, black
– Straight pins
– Tailor’s chalk
– Sewing machine /matching thread
– 1 T-shirt, red
– 2 Pipe cleaners, black
– pattern (click here for pattern)

Instructions:
1. Cut sleeves off red shirt, using scissors.
2. Place plate on black T-shirt. Trace six circles with tailor’s chalk. Cut out and pin circles on red shirt.
3. Thread sewing machine with black thread. Sew on all circles.
4. Place wing pattern on stiff felt. Trace around with chalk. Cut out two.
5. Flip red shirt to back. Place wings in center top of shirt. Refer to photo. Pin in place.
6. Sew only center edge of wings on shirt. Refer to photo.
7. Place red Crystals around inner edge of each circle, using Tweezers.
8. Heat Heat-Setting Tool following package instructions. Gently place tip of Tool on top of Crystal. Hold for about 5 to 6 seconds. Repeat for all Crystals.
9. Outline wings with clear Crystals. Refer to photo.
10. Tip: If you have some black t-shirt leftover, make long armbands.
11. Twist one end of a pipe cleaner around a pom pom. Repeat with other pom pom and pipe cleaner. Wrap other end of pipe cleaner around headband.

Craft on! Click here for today's daily giveaway!

Friday, October 22, 2010

31 Days of DIY Halloween - Lady Gaga Costume

lady gaga outfit

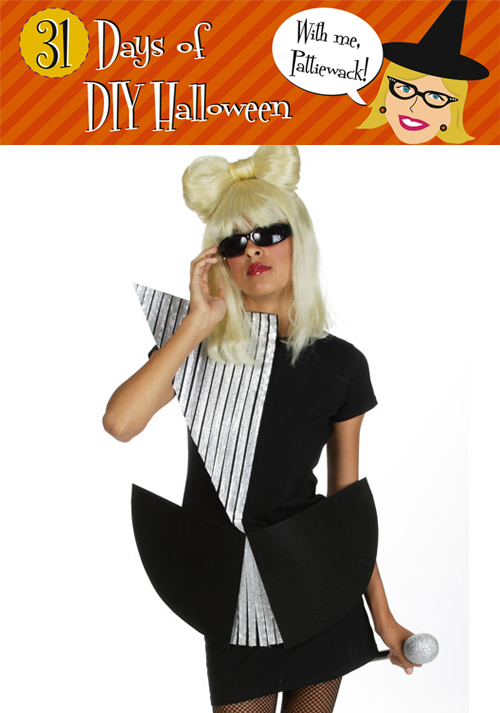
I wanted to make a costume that looks like lady gaga, but it was hard to pick just one. I decided to go with this one, because I knew I could turn one black t-shirt into a SKIRT, and another black t-shirt into the TOP. Oh, and the crazy hair-bow/wig was a totally crazy idea I had to cut up a wig and glue it into a big bow on a headband. I love how it turned out, and how fast you can look like a super star! Karaoke, anyone?

Materials:
Aleene's® Fabric Fusion® Permanent Dry Cleanable Fabric Adhesive
– Wide headband
– Black thread
– Safety pin
– Rubber band
– Sewing machine
– Straight pins
– Blonde wig with bangs
– Craft stiff felt rectangles – (3) black and (1) yellow – 12”x22”
– 5/8” Black ribbon – 7 yards
– Scissors
– 5/8” Silver ribbon – 7 yards
– T-shirts – (2) black

Skirt:
1. Cut top off T-shirt from under the arms, straight across.
2. At top, turn under 1-inch and sew all the way around to form casing for ribbon.
3. At front and center, snip two slits in casing, 1-inch apart.
4. Hook a safety pin into the end of black ribbon. Push into one slit in casing and out the other slit.
5. Tie ends of ribbon to fit waist.

Top:
1. Cut stiff felt into a scalene triangle measuring 12” x 18” x 22”.
2. Glue ribbon in rows across the entire triangle, using Fabric Fusion. Pin in place until dry.
3. Glue embellished triangle to front of T-shirt, using Fabric Fusion. Refer to photo for placement. Pin in place until dry.
4. Cut stiff felt into an isosceles triangle measuring 8” x 10” x 10”. Cut 8” side into a slight curve.
5. Glue ribbon in rows across the entire triangle, using Fabric Fusion. Pin in place until dry.
6. Glue embellished triangle pointed side up in the center of the T-shirt, 5” up from bottom of shirt. Pin in place until dry.
7. Cut two pieces of stiff felt into a rectangle measuring 13” x 11”. Cut off one corner in a curve on both pieces. Glue pieces over the edges of the embellished triangle, five inches from the bottom of the shirt. Pin in place until dry.

Wig:
1. Cover headband with yellow felt, gluing in place with Fabric Fusion. Hold in place with pins until dry.
2. Cut wig in half from ear to ear, leaving front and back pieces.
3. Glue front half of wig to top of the headband with bangs in the front; holding in place with pins until dry.
4. Using back half of wig, cut off a 3” wide portion at the center of backside. This will leave two equal groups of hair on either side of wig.
5. To form hair bow, use the two equal groups of hair and form loops with the ends meeting in the center. Hold ends together with rubber band. Wrap the rubber band with the 3” wide piece of wig, gluing into place. Hold in place with pins until dry.
6. To complete, glue hair bow to the top of the wig that is glued to the headband.

Miscellaneous NotesAdd to the costume by gluing a foam ball on the end of a black dowel with Aleene’s® Tacky Glue™, covering the ball with glue, and sprinkling with silver glitter for the perfect “pop star” microphone.

Craft on! Click here for today's daily giveaway!

DIY Spider Web Necklace


I love Halloween! And the peeps at iLoveToCreate love it toooo.


Our copy writer Chloe Tatro, is modeling the Black Widow Necklace that took about 5 minutes to make. And if you're like us, you're looking for a fast and easy "costume" for Halloween. So, I came up with this crazy idea to create costume necklaces.


You'll never believe that this is only Tulip 3-Dimensional Slick Paint.
That's ALL!

EeeeeeEeeEeeeK! Chloe's neck has been slashed!

Look closer and you'll see that it's another one of my Tulip 3-D Paint necklaces made to look like bloooood. Eeeeyoooo.

The guys in the marketing department got into it, too. Nate Hough's neck was just the right size for a bigger squeeze of Tulip 3-D Paint to come oozing out in a bloody disguise.

Here's what you need:

Tulip 3-D Red Slick Paint
Teflon Sheet

Here's what you do:
Draw a circle of paint the same size as your neck, and then draw the paint into bloody drips on the sheet. I let it dry overnight to be sure that it's good and dry. Then put it around your neck and connect the ends together. They will stick together, but if you are very active, you may want to hold it together with a safety pin.

The spider web is done the same way with Tulip 3-D Black Slick Paint. Be sure that you connect it completely together so that none of the web falls down. You know, you could also paint a web on a shirt using this idea and have a permanent spider web to wear year after year.

Hey, thanks to Chloe and Nate for your necks….
Happy Halloween!
Pattiewack

Sunday, October 17, 2010

31 Days of DIY Halloween - Power Girl Costume

super girl

We love it here at iLoveToCreate, when we get to see our co-worker’s kids, and the cutie-pie belongs to Holly Brant, one of our marketing department peeps. She was really feeling the Girl Power when she put this sparkly costume on! You can’t see in the photo, but the cape is a second t-shirt the I cut out the front and left the neckline of the t-shirt. Then I glued and glittered the edges to make a SUPER cape!

Materials List:
Aleene's® Fabric Fusion® Permanent Dry Cleanable Fabric Adhesive
Tulip® Fashion Glitter™ Pack in Metals
Tulip® Fashion Form™
Tulip® Fashion Glitter Bond™
– Straight pins
– Paper
– Scissors
– Felt squares – (4) yellow, (2) red
– T-shirts (2) – child’s size – red
– Headband
– pattern

Instructions:
1. Prewash and dry T-shirts to remove sizing. Do not use fabric softener.
2. Insert T-shirt Form between layers of fabric.
3. Cut out pattern pieces and attach with straight pins to corresponding colored felt
pieces.
4. Cut out emblem, power belt, two cuffs, two stars and two headbands from yellow felt.
5. Cut out two cuffs and three stars from red felt.
6. Headband – Use Fabric Fusion™ to adhere felt to bottom and top of headband. Hold in place with pins until set. Use Fabric Fusion™ to adhere red felt star in center of headband. Place a piece of paper behind headband. Apply Glitter Bond™ around edges of headband with sponge applicator. Pour glitter onto Glitter Bond. Paper will over catch excess glitter for reuse. Let dry.
7. Emblem – Use Fabric Fusion™ to adhere emblem to center of chest on T-shirt. Glue red star in center of emblem. Hold in place with pins until set. Apply Glitter Bond™ around edges of emblem with sponge applicator. Pour glitter onto Glitter Bond™ over a piece of paper to catch excess glitter for reuse. Let dry.
8. Power Belt – Glue belt pieces to bottom of T-shirt with Fabric Fusion™ in the design shown. Glue red star in center of belt. Refer to photo. Hold in place with pins until set. Apply Glitter Bond™ around edges of belt with sponge applicator. Pour glitter onto Glitter Bond over a piece of paper to catch excess glitter for reuse. Let dry.
9. Power Cuffs – Use Fabric Fusion™ to adhere yellow cuffs to red cuffs. Hold in place with pins until set. Glue yellow stars on the red side of each cuff, at the top of the point. Hold in place with pins until set. Apply Glitter Bond around edges of cuffs with sponge applicator. Pour glitter onto Glitter Bond™ over a piece of paper to catch excess glitter for reuse. Let dry.
10. Cape – Using second T-shirt, trim around the front of the neckline, cutting off front and sleeves of T-shirt. Cut down both sides of T-shirt back to form a cape. Be sure to leave neck of shirt intact. Apply Glitter Bond™ around edges of cape with sponge applicator. Pour glitter onto Glitter Bond™ over a piece of paper to catch excess glitter for reuse. Let dry.

Craft on! Click here for today's daily giveaway!

Saturday, October 16, 2010

31 Days of DIY Halloween - Ba Ba Black Sheep Costume

sheep

This cute little guy belongs to one of our graphic designers, Edd Pilande and he wasn’t all that excited for his big photo op (we had to Photoshop in his face from another happy photo). But doesn’t he look adorable? For this cuddly sheep costume, I grabbed a bag of batting and glued it to a pair of black pj’s then I cut out the ears from felt and glued them onto a stocking cap with some more batting. Easy-peasy!

Materials List:
Aleene's® Fabric Fusion® Permanent Dry Cleanable Fabric Adhesive
– Stocking cap, black
– Scissors
– Children's pajamas, black
– Felt squares, black (1) and brown (1)
– Straight pins
– Batting
– Patterns (click here)

Instructions:
1. Using pattern as a guide, cut two large ears from black felt and two small ears from brown felt.
2. Glue brown ears in the centers of the black ears with Fabric Fusion. Press pieces together to set. Let dry.
3. Pinch a pleat at the base of each ear and glue folds together. Pin together until dry.
4. Glue ears to sides of cap, pinning in place until dry.
5. Squeeze glue onto cap and press batting into glue, covering a 6-inch area at a time. Pin into place until dry. Repeat for batting on pajama top. Let dry and remove pins.

Craft on! Click here for today's daily giveaway!

Thursday, October 14, 2010

31 Days of DIY Halloween - Boo-ti-ful Spirits Banner

boo banner

Would you believe this cute banner is made from a black t-shirt? Whether you’re making it for your front door, your office cubicle, or your Halloween party, it will be terrific when you turn out the lights, because the 3-D paint GLOWS in the DARK!

BOO-ti-ful Spirits BannerDesigned by Cheryl Ball

Materials:Aleene's® Fabric Fusion® Permanent Dry Cleanable Fabric Adhesive
Tulip® Craft Mat™
Tulip® 3D Fashion Paint™ Value Packs and Sets
10 pack Glo
– Ribbons – assorted colors desired
– Paper towels
– White chalk – sharpened to a point
– Scissors
– Straight pins
– T-shirt – Black – XL
– Patterns (click here)

Instructions:
1. Cut out banner pattern then pin to double layer of black T-shirt. Cut out then repeat step creating a total of four pennants.

2. Flip over design pattern. Using white chalk, lightly draw over pattern lines holding up to window if needed to see lines.

3. Position first pattern, chalk side down, on first fabric pennant and hold in place. Press fingers along pattern lines to transfer design to fabric. Repeat with all designs and pennant pieces.

4. Place fabric pennant on Craft Mat – it will prevent paint from seeping through to work surface and is easy to clean. Test flow of paint on paper towel using an even pressure on bottle for a smooth line. Starting with first pennant, outline each section then fill in with color shown, applying an even coating. Use a straight pin to pop any bubble that may form. Carefully slide off Craft Mat and let dry. Repeat for remaining three pennants.

5. Measure and cut a 6-ft. length of ribbon for hanger. Center pennants along ribbon spacing approximately 4” between and leaving longer tails at each end. Apply a thin bead of Fabric Fusion on ribbon, position banner section in place and press to secure.

6. Using ruler on Craft Mat, measure and cut 8” sections from ribbons, cutting enough for about four ribbons between each pennant and at ends. Tie around long hanger ribbon as shown.

Craft on! Click here for today's daily giveaway!

Wednesday, September 3, 2008

Sewing Art


Faythe Levine is documenting the rise of DIY and the new wave of art, craft and design. Handmade Nation the book will be released by Princeton Architectural Press in November 2008 and the documentary with the same title will be released in 2009. The art being used to promote the release is fabulous! Check out the zipper, the spools of thread, a box knife, needles, buttons, scissors, thread, and beads.


Speaking of sewing notions, when I saw these on West Elm, I went crazy! We can make these! They are simply wooden boxes painted white, with stenciled icons of scissors, rulers, and a needle and thread. I'm a nut for organizing, and it's almost impossible to walk down the aisle at the discount stores without buying tubs and plastic boxes to hold all my craft stashes. Now I will have the perfect way to cram my sewing stuff into cute boxes that can sit anywhere. Who needs plastic when they can have cute?

Monday, June 18, 2007

DIY Vogue Fashion


I totally flipped when I saw the latest Teen Vogue magazine that I picked up at Barnes & Noble yesterday. There was a crafty article in there that reminded me of this cute fashion project I did a few years ago.


Is this not sweet? The cute model chicky is Denise, and she is a great friend. Her ankle length shift is embellished with wordly places, cut from white fabric that I ironed to fusible web, and simply ironed onto the dress. Way easy!


Well, the Henry Holland style in the Teen Vogue is the same sort of look, with a different technnique. If you go to the Teen Vogue DIY page, you can see how they did the letters with jewels glued on, using stencils as a guide. I just love, love, love the huge jewels! Now I'm going to have to find my bin of giant acrylic jewels and make myself a shirt.