Sunday, September 8, 2013

Bottle Centerpiece

I love to pick up fresh flowers on Sunday afternoons and fill the house with that sweet smell. 
I used some recycled bottles for the dahlias and mums on the dining room table. 
The gerberas and daisies were just right for the studio. 
And the carnations were just perfect for the guest bathroom. 
Now I'll just have to choose one single flower to take to work tomorrow for my desk!

Thursday, August 15, 2013

How To Make a Pompom Boa!

 
Here's a simple DIY pompom boa that feels like a fluffy furry scarf around your neck.  
Choose yarn from your stash, or find some beautiful new yarn that compliments your fall wardrobe.
Or, make a pompom boa to give as a gift.
To make it super easy, use your PattieWack Pompom Tool to make the easiest pompoms ever.
I hope you like it!

Thursday, July 25, 2013

DIY iPhone Case - Vintage Junk Jewelry


Check out the DIY iPhone case I made with vintage junk jewelry.    I'm not usually a girlie girl, but sometimes you just need pearls, rhinestones, charms and buttons, right? 

 
So, when I found this marked down iPhone cover at Ross, I couldn't resist picking it up for $5.99. 
It was the perfect base for me to start with and add a little bling and sweetness.
I have to admit that I'm a little bit of a hoarder when it comes to vintage jewelry.   And it was really hard to choose exactly what I wanted to glue to the cover.  But I knew it needed just the right stuff.
 
Seriously, I could have just started at one corner and cover the entire thing, but I really wanted the flowers to be part of the design.  So I chose a handful of my favorite things and the charm "inspire".
I grabbed one of my favorite glues, Aleene's Jewelry & Metal adhesive, and it worked great.
 
Some of the pieces were earrings and buttons, and I snipped the backs off so that they would lay flat against the case and insure that the glue would hold when I shove the phone in and out of my purse.
 
And of course, I had to add a little "WACK" to my design with fabulous silver alpha cubes.
I hope you like it, and will be inspired to personalize your own phone cover with whatever you love.

Tuesday, May 7, 2013

DIY iPhone Cover with Studs

 
I've been looking for just the right thing to add bling to my iPhone, and I found it.  STUDS!!
 My DIY cellphone cover with studs came together really fast and easy.  First I went online and found flat backed gold studs. (Just google it, and you'll find exactly what you need...) Then I grabbed a package of the Aleene's Jewelry & Metal Glue dry adhesive dots.  These things are crazy cool!
 Next, I used a clear ruler to line up the adhesive dots and stuck them to my animal print cover in rows.  You'll be able to cover the whole thing, or do like I did with four rows of eight,in the center of the phone.  The 1/4" dots fit the bottoms of the studs perfectly.
 I used tweezers to peel off the red backing from the Aleene's Jewelry & Metal Glue dots.
 Then I sat the studs right on top of the dots.  You have to be pretty precise because those boogers really hold fast, and it's tough to pull them off and realign.  Just be patient and take your time.
I didn't have to wait for it to dry, since the adhesive is instant! I hope you like my studly bling.  It added a lot of pizazz to my phone, and makes it totally different than anybody else.  Easy-peasy.  What do you think?

Tuesday, April 23, 2013

Trashique 2013 Couture

This year for Trashique, I was invited to design a gown inspired by Erte' with nothing but trash and recyclable materials.  This challenge was so much fun!  As you can see, I chose the Symphony in Black by Erte' to compose a piece that is completely black and extremely dramatic.
 The headpiece is made with a vinegar bottle, shredded VHS tapes, and magazine pages rolled up and glued together.  I also used an aluminum turkey basting pan for the medallion in front.
Chloe Tatro was my model, and took on the fierce attitude of the gown in the most amazing way! Thanks Chloe, for your dedication and grace on the runway.

 As most of you know, I'm huge into altered shoes, and so I simply had to do something crazy for them. The heels have eyes on them from magazine pages, and the toes are covered in shredded VHS tapes.  The straps have wine bottle tops on them to simulate jewels.
 The biggest accomplishment was making the pompoms for all three boas.  I'm estimating that I made at least 300 pompoms from VHS tapes and tied them all together.  Perfect for Trashique!


The dress is weed control sheets from our yard, glued to a thrift store dress, and the bodice is a discarded leather skirt.  I cut the waist band to form the choker around the neck.  A train made with layers of the ground cover is attached to the base of the dress with velcro. 

I'll put up more photos of the details.   Oh, and of course, I'll post some pics from the Trashique' event.  It was so fun, and we raised lots of money for the Fresno Art Museum.

Wednesday, December 19, 2012

Sunday, December 16, 2012

Christmas Plates

 
Decoupage Plates for Christmas...
I found these plates in my Christmas decorations today, and they made me soooo happy!  They are 7 years old, but it's like yesterday when I look at them and makes me giggle because of my quirky family.

You can capture the candid moments of the holidays with your family as you glue their photos onto glass plates or a platter, ready to serve up goodies or display playfully on the mantel.     

Supplies:

Glass plates and platter (plastic works as well)
Decoupage  or laminate glue
Color copies of photos (do not use glossy paper)
Decorative paper (gift wrap, tissue, napkins, Christmas cards, wallpaper, old calendars, art prints or packaged paper)
Scissors
Disposable brush
Disposable plate
Spray sealer

Steps:
1. Cut background away from figures to use as focal point on dish. Glue to back of dish using decoupage glue and disposable brush, being careful not to get glue on plate where plate is clear. Let dry.

2. Add borders of paper, patchwork of tissue or napkins, cutouts, and other images, layering over the photos.

3. Apply an additional coat of glue over the entire plate.  Let dry.

4. Apply sealer to back of plate if not using laminate glue. Let dry.


Have FUN with it!!!


Thursday, December 6, 2012

How to Make Ice Candles

Ice Candles are so much fun to make, and I'll show you how easy there are.  Here's several ways to make them.  They make really cool gifts, and are great to decorate you home.  Enjoy!

Sunday, November 11, 2012

Wednesday, October 31, 2012

Happy Halloween everyone from Pepper Pattie and Salty Scott!!

Happy Halloween everyone from Pepper Pattie and Salty Scott!!

Pepper Pattie

Salty Scott

Sent from Pattiewack's iPhone

Tuesday, October 23, 2012

Saturday, October 20, 2012

Thursday, October 18, 2012

Monday, October 15, 2012

Thursday, September 27, 2012

Design Studio and Craft Organization featured in STUDIO Magazine


My design studio is featured in the Cloth Paper Scissors 2012 Craft Studio Magazine this month!  For years I've dreamed of having a place where I can organize my craft supplies and have a huge space where I can sew, make PattieWack Pompoms and Tassel projects, dress and decoupage manequins, and design outrageous mixed media fashion.  And with that dream I always wondered how it would feel to see my own studio in a magazine editorial.  Well, pinch me!  It came true.... thanks to Interweave Press.


You can only imagine my surprise when our friend Alexa Westerfield, aka Swell Designer hooked me up with Linda Blinn, Editor for Cloth Paper Studios magazine. Thanks, Alexa!  Here are some of the pics that you'll see in the article, and some that were taken but didn't get in the magazine.


As you can see, Scott and I took the sunroom of our new digs in Fresno, California, and turned it into a sunny place to design and hang out with friends.  He installed the IKEA cabinets in both corners, and I filled them up completely with my favorite things.  For some cushy seating, I covered a wicker love seat with fabric that reminds me of Zentangle.  The pillows are covered with fabric that is simply tied in knots.  Oh, and the hanging light fixture is a hula hoop with fabulous fabric I picked up in the fashion district on a trip to LA.  
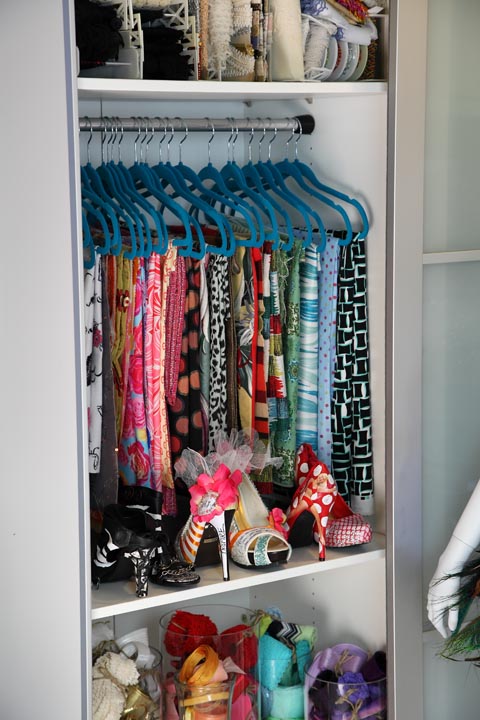

I guess I'm one of those odd people that is creative AND organized.  I couldn't hardly wait for Scott to finish the cabinets so that I could hang my favorite fabrics up and put my bolts of trim in storage bins turned on their side.  That's some of my altered art shoes that were featured in a recent Altered Couture Magazine.  I took several glass cylinders and filled them with ribbons that I took off the bolts, tied them with raffia, and organized them according to colors.


Mixed media projects take up a lot of space and can get out of control, but I have managed to sort everything into those plastic bead organizers I pick up when there's a sale.  Hundreds of rubber stamps are stashed in glass jars next to a cork ball I made by gluing them to a dollar store ball.  You can tell that I work for one of the largest craft adhesives companies, that makes the Aleene's Tacky Glue, and I used spice racks to organize all of my glues.  As Lead Designer at iLoveToCreate, I have lots of paint, glue, crystals, and glitter in my stash of craft supplies.


The sewing room is also our guest room, and Scott took old cherry bookshelves, painted them white, and installed them for my threads, sewing machines, and everything else.  I love those wooden spool holders to organize thread, and jars filled with buttons.  I can't walk by vintage luggage at garage sales and thrift stores without buying them.  They are perfect for storing tons of zippers, tools, and yarn.


The coffee bar in the studio is shared by Scott for keeping brushes clean and for an extra shot of espresso during a long design binge.  My friend Kelly Georgette Phelps from The Spotted Fox made the cute teacup pincushion. She and I used to work at Simplicity in Nashville.  The canister filled with vintage coffee cups is the one I made when taping the Magazine Rollups Video on my Youtube channel.


Plastic shoe boxes from the dollar store are great for organizing tons of small bits for mixed media art.


I guess my favorite place in the whole world, besides being with my family, is right here in my bubble chair.  I love to read, sketch, and blog there.  And I love it the most when I share it with friends and family.  I have to give a shout out again to Linda Blinn for featuring me.... Thanks Linda and Alexa!