Showing posts with label #pompoms. Show all posts

Tuesday, July 15, 2014

New Blog Look on Pattiewack!


I think my biggest downfall is boredom.  (sigh) As you can see, I got bored with my blog and just had to go in and change it up.  It all started this weekend when I was browsing around and did a little test on +Home Good's blog to see what my style is.  (As if I didn't know already!) And I discovered that I'ms Sassy with a dash of Boho.  Yep, I knew it.  But my blog didn't really say that about me, so I went into blogdom and started playing with the template.  I'm still not finished, but at least I'm experimenting with it, right?

So here's my question.  What do you like when YOU go to blogs?Do you just go there for the eye candy?  Do you like a good story?  Are you searching for tutorials?  Patterns?  Free stuff?

Let me know!  Make a comment here on on my PattieWack Designs Facebook page and tell me WHAT MAKES A GOOD BLOG?

That's it for now!
Pattiewack

Monday, June 2, 2014

Crafty Chica - How To Make Purse Tassels and Keychains


I'm super excited about Kathy Murillo's blog post today!  She made the most adorable purse tassels and keychains with the PattieWack Tassel Tools.  Her color choices are SO much fun, and her energy is electric in her tassel-making designs.  She even made a keychain for her hubby Patrick that you'll just love.  
Thing is, she made it in PINK, so his face is PRICELESS!  hahaha!

Please visit Kathy and Patrick on the CraftyChica .com blog today and see some fabulously fun ideas!

Click here for Kathy's tutorial, video, and tons of pics!


Tuesday, January 21, 2014

Banners Of Hope - Promoting the Healing Art of Crafting

Pattie Wilkinson

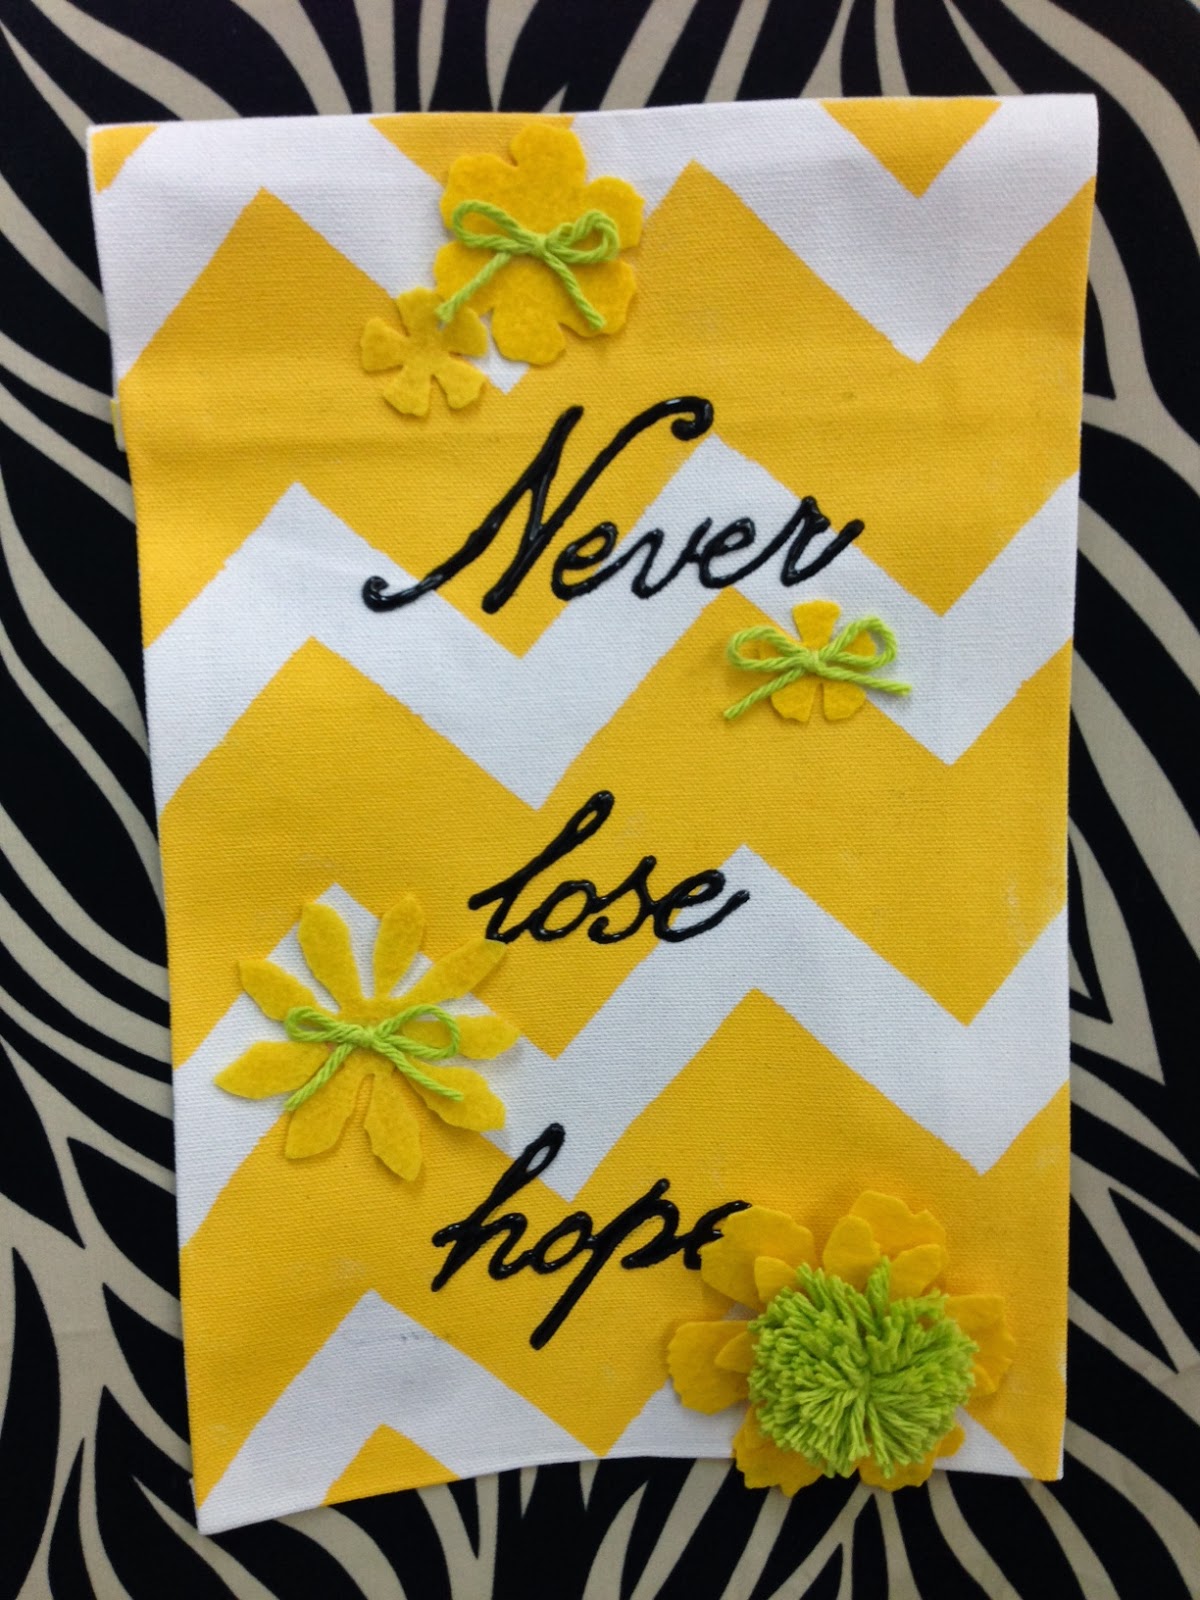
A display of “Banners of Hope” Project banners was created by CHA designers and displayed at the CHA 2014 Show.  The banners were donated to the “Charity Wings” www.charitywings.org outreach program for their charity promotional event, held January 15-16, 2014, to be broadcasted on the web.  The banners will also be used by the Charity Wings traveling exhibit to promote the healing art of crafting. 

I loved making my Banner of Hope.
First I used masking tape to make chevron stripes and then painted it with Tulip Soft Paint in Sunflower.  After it dried I peeled away the tape and wrote "Never lose hope" with Tulip Puffy Paint. It took 2 or 3 hours to dry after that, and then I cut out felt flowers and glued to the banner with Fast Grab Tacky Glue.  Of course, it simply HAD to have at least one pompoms, so I made a quick yarn pompom with the Pattiewack Pompom Tool and glued it onto the big felt flower.  To finish the cuteness I tied some yarn bows and glued them in the centers of 3 of the felt flowers.  

I am happy that Charity Wings will be hanging it somewhere that will bring a little glimmer of hope to someone.  But I have to say that I really enjoyed the fact that I was part of a fabulous group of Designers through the Fabric Arts Council.  If you were on of the designers, I just want to say thanks for including me!  

Here are just a few of the dozens of banners created by designers and 
people who want to share hope:


Saturday, December 14, 2013

How To Make A Christmas Tree Mannequin - Video Tutorial

Christmas Princess

I love to make alternative fashion art with mannequins, so when we decided not to put up a Christmas tree this year, I thought about how I could turn a mannequin into a Christmas tree.  I mean, why not?
Scott agreed to capture it all on video, and cut evergreens from the trees in our backyard, so all I had to do was start gathering the materials and get creative. This was going to be so much fun!

Christmas Tree Skirt

As you'll see when you watch the video tutorial, we used 3 different kinds of greenery; pine, cedar, and nandinas with red berries.  The Christmas lights are LED so that they won't dry out the fresh branches.

Christmas Mannequin Lace Collar

One of my favorite things is collecting bits of lace and doilies and vintage crochet pieces.  I was so excited when I found this handmade lace collar in my stash along with several other pieces I had grabbed in estate sales, thrift stores and garage sales over the years.  I just can't pass them up!


Christmas Mannequin Pompom Belt

To cover up the ends of the branches from the skirt, I made a pompom and doily belt to tie around the mannequin's waist.  The tutorial is below for making the belt and the lacey collar.

How To Make Pattiewack Pompoms

For the belt and large pompoms I used Redheart Sashay Yarn.  For the other pompoms I used from my stash of Coats & Clark yarns.  The more organic yarns with bits of sparkle seems to fit naturally.

Just in case you haven't seen the Pattiewack Pompom making tools, here's a little tutorial.  You can watch a full video on my website, too.  Step 1 is to wind the yarn around the tool until it is super thick so that you'll have a really nice and full pompom. For this pompom I wound the yarn on the 4-inch section of the Pattiewack Pompom tool because I wanted it to be the accent at her waist.

 
Step 2 is to wind heavy wire around the center very tightly.  Step 3 is to cut both sides of the pompom.

 
That's it!  You can trim the pompom if you like, but that's all there is to it.

How To Make Lace Collar Collage

It was super simple to make the collage of lace by starting out with the vintage collar as my base.

 
Next, I laid out my bits of old lace that had been cut from old garments, and tea stained doilies.

 
I found this bridal lace with sequins on it to brighten it up, and a feather tassel.  It was easy to put it all together by intertwining sparkly yarn in and out by hand for a temporary hold until after Christmas.

 
The last step was to tie the feather tassel onto the shoulder of the collar.

How To Make Christmas Tiara

Check out the video to see the tutorial on assembling the wintry crown of evergreens and pompoms.
I hope you love it as much as I do!  The studio looks so pretty with my little Christmas Princess, and it took the place of a Christmas Tree this year.  
Scott and I will be out of town for Christmas, so we'll be taking our mini aluminum trees with us to spruce up our room.  I'll be sure and post it when we get there. Let me know what you think about my Christmas Mannequin, and tell me what crazy things you're making for your decorations this year...... 

Merry Christmas Everyone!

PattieWack


Thursday, December 12, 2013

How To Make Pompom Pens!

Pompom Pens are the perfect idea for Christmas gifts, and I've been working like crazy on pompom goodies to sell in our iLoveToCreate Christmas boutique next week.  My stash of yarn has been so great for all of these projects since they don't need to match each other, but they are so pretty with mixed bits of yarn in coordinating colors, don't you think?

These are super quick to make and would be just the ticket for office gifts or stocking stuffers.  It only takes about 15 to 20 minutes to make one, and nobody will walk away from your desk with these pens without anyone noticing, right?  

My daughter Stacey and I did a bouquet of pens to take to the treasurer's office where she works, and she is hoping that they'll add a little pizzzaz to the boring counter.

Here's what you'll need:


Steps:

  1. Make a 2-inch pompom on the Pattiewack Pompom Tool, ending the last 10 winds with contrasting yarn. (Watch the video here for pompom how-to.)
  2. Tape pompom wires to end of pen with tape, continuing the tape all the way to the tip. 
  3. Peel off backing from tape to expose adhesive.
  4. Starting at the tip of the pen, wind yarn around pen to cover the adhesive, all the way to the top.  Tie off the end of the yarn to finish.


Now if I don't sell all my pens at the boutique, I'm ready to write in my bunny journal, sign Christmas cards, or give away my pens for gifts!  Let me know what you're making for Christmas this year....

Merry Christmas Everyone!

PattieWack


Saturday, December 7, 2013

How To Make Fluffy Pompom Slippers


Don't you love waking up on Christmas morning and putting your feet into some fluffy slippers before they hit the cold floor?  Me too!  And if you're looking for a way to add a personal touch to a gift this Christmas, I think these would be so much fun to give or to get.  

All you need to do purchase a pair of slippers and make matching pompoms.  Of course if you are a knitter or love to crochet, you'll be making your own slippers. (insert happy face) I attached my pompoms with big safety pins so that I can take the pompoms off when I toss the slippers in the washing machine.  

If you're shopping on a budget, it's a good idea to buy several pairs for your friends and family in the same color so that you can create a little assembly line of the same color of pompoms.  
That way you can get by with just 2 skeins of yarn for several presents.  Right?  

I hope you like them, and spread the fluffy love with fluffy pompom slippers for everyone!

You’ll need:  
Purchased or handmade slippers 
2 Large safety pins
Yarn that I used to match my raspberry red slippers :
MODA DEA™Cheerio: 1 Ball No. 8778 Ruby
MODA DEA™Cartwheel: 1 Ball No. 9745 Raspberries

Steps:
Wind both colors of yarn at one time onto the pompom tool at the 4” step, and wind 25 times.
Tie the center of the pompom tightly with 12” length of yarn.
Cut the pompom away from the tool.
Pin the pompom to the toe of the slipper with a large safety pin.
Repeat for the other slipper.

Happy Holidays!
PattieWack


Thursday, December 5, 2013

How To make Pompom Christmas Trees


Cute little felt and pompom Christmas trees are fast, fun and easy to make.

I made these in about 1 to 2 hours and now I have them to use for decorating my house for years and years!  These are only 12 inches tall, so they'll sit nice on the mantle or as a kitschy centerpiece.

First I drew up a simple pattern which is easy to print out or draw on a piece of standard size printing paper.  I cut out two trees at a time with pinking shears so they match perfectly.  I also cut out the circles so that the tree tops were a little more significant. Then I sewed them together on the sewing machine.  You could sew them by hand if you prefer.  I left the bottom open and stuffed them with some batting from my stash.  I placed a dowel rod up the center and glued the bottom closed around the dowel rod.  Then I drilled a shallow hole in a piece of balsa wood, glued the dowel into the hole with Aleene's Tacky Glue.  (I did paint mine before I assembled it, but you might like it with the unfinished wood.)

Then the fun began!  I made 1-inch pompoms with the Pattiewack Pompom Tool in red, greens and a shaggy white yarn.  I glued them on, holding in place with a pin until the glue dried.  I also glued some little buttons on to add a little extra zing.


I love how they turned out!  I think they would be cute no matter where I decide to put them. 

Pompom Christmas Trees